Homemade purfling advice please

miche

Active member
Joined
Mar 3, 2009
Messages
40
Reaction score
0
Location
London
Hi everyone
I just needed some advice. I attempted to make some purfling which ended up going horribly wrong and I think the reason maybe the glue that I used which was red titebond. I am making two instruments at college one which has black-red-black-red purfling around the rosette and the same purfling which I had planned to glue to ebony binding to bind the instrument. The veneer for the purfling is a dyed black veneer and the red is made or padauk as the instrument is padauk. For the second instrument the binding will be made of a brown-white-brown-white which is maple and rosewood veneer again which I planned to glue to flame maple binding.
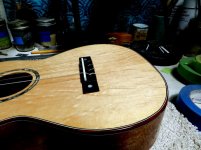
The first issue I had was cutting the strips. I used a scalpel blade and the strips of purfling came out less then perfect. I think this was because I was cutting through veneer which was 2.4mm thick after being glued up. However the real issue was bending the purfling. I struggled initially as the radius for the first instrument a baritone ukulele was so small. I struggled to get a circle and suffered multiple snapped strips and when the strips did not snap they de-laminated and the glue just melted away. I turned the heat down but it all melted and separated. In the end for the rosette I cut strips of veneer and inlayed them straight into the rosette. The result is a ruined soundboard. It was a nice soundboard and one I don't imagine I will come across again anytime soon which is disappointing.
So I wondered what people use to glue purfling and their techniques on bending tight circles.
Thank you
 

Attachments

  • IMG_0115.jpg
    IMG_0115.jpg
    91.4 KB · Views: 118
  • IMG_0117.jpg
    IMG_0117.jpg
    89.1 KB · Views: 103
There is nothing wrong in using Titebond original.

However, the way I would tackle this inlay is to route out the area for the large tiles and inlay them first. Perfecty fine to use Titebond original.

Then come back after that has dried and rout out the channel on either side for the purfling strips.

Then seal up the chanels with at least a couple coats of thin shellac. Taking special care to do the end grain. You absolutely MUST seal Spruce and Cedar if you do the next step as described. If you don't, I can assure you that there will be tears when you see what happens.

Now fit the single pieces of veneer into the channels dry. If it requres a touch on the bending iron, that fine, but I find it's rare when they are single veneers. Take your time and get it right. You might even find that you have to tweak the diameter of the chanels or thickness of the veneers to get a good fit.

When everything is how you like it, wick in thin CA glue. It will get pulled into the chanel and between the veneers.

Let dry and then scrape or sand level.
 
Last edited by a moderator:
You can save that soundboard. Glue a circular piece of soundboard material on the back of the soundboard so you can establish a pivot point and have something to glue to. ( must be larger than rosette) Rout out the current messed up rosette and have another go at it. I will require some careful work but is very doable. I have done this more times than I care to admit.
 
one I don't imagine I will come across again anytime soon
Yes, that's a nice soundboard and worth rescuing as described above. If you don't have any success try Googling Alaska Specialty Woods. They have amazing bearclaw spruce sets at very reasonable prices.
Miguel
 
Yes, that's a nice soundboard and worth rescuing as described above. If you don't have any success try Googling Alaska Specialty Woods. They have amazing bearclaw spruce sets at very reasonable prices.
Miguel

A couple of things:

- Titebond original works great for me. My only beef is why they add that yellow dye. I wish it came white and clear, but white doesn't sell like yellow apparently. I don't think Titebond is your problem. I glue my rosettes in with CA glue and yes, must seal with shellac before or you really will ruin your top.

- Somebody used to sell a slick little purfling maker tool where you could draw through wood and get perfect shaved strips. Personally I just buy the stuff. Cheap at any price.

- I don't think the rosette looks that bad. Maybe it will look better once it is sanded out.

- I've bought some bear claw from Alaska Specialty Woods and it looked great. Comes a little raw and thick but no problem. Book matching was good. My quibble was that it wasn't very stiff. Kinda spongy.

DSCN6830.jpg DSCN6833.jpg
 
Last edited:
I make my own purfling strips Black-red-black, black-green-black, etc. for different projects/looks. I glue up 3" wide sheets of dyed veneer using a urea veneer glue Pro-Glue (widely available). This mixes with water, has a long open time, and hardens by chemical reaction so once it is set, nothing takes it apart, especially not heat or water. I then cut the 3-layer veneer laminate up into purfling strips using a very fine 24 tooth/inch blade on my small cheap 10" bandsaw. The blade is actually a metal cutting blade, but does a wonderful job (no tear out, smooth edges) on the veneer and I can easily cut 1/8" wide purfling strips against a simple fence. It has a 'wavy' edge as opposed to the standard tooth set. https://www.bandsawbladesdirect.com/lenox-neo-type-carbon-steel-band-saw-blades

Since the purfling is glued up with urea glue, I can wet it and bend it into tight circles around a hot pipe with no de-lamination problems.
 
I started in this hobby resawing wood on my metal bandsaw (doing things the hard way). I still use it even though I got a wood bandsaw, keep a coarser blade on that one and a 24" on the metal one. Also find it good for doing thin work.
 
I make my own purfling strips Black-red-black, black-green-black, etc. for different projects/looks. I glue up 3" wide sheets of dyed veneer using a urea veneer glue Pro-Glue (widely available). This mixes with water, has a long open time, and hardens by chemical reaction so once it is set, nothing takes it apart, especially not heat or water. I then cut the 3-layer veneer laminate up into purfling strips using a very fine 24 tooth/inch blade on my small cheap 10" bandsaw. The blade is actually a metal cutting blade, but does a wonderful job (no tear out, smooth edges) on the veneer and I can easily cut 1/8" wide purfling strips against a simple fence. It has a 'wavy' edge as opposed to the standard tooth set. https://www.bandsawbladesdirect.com/lenox-neo-type-carbon-steel-band-saw-blades

Since the purfling is glued up with urea glue, I can wet it and bend it into tight circles around a hot pipe with no de-lamination problems.

Hi. I'm hoping to make some purfling soon, and have bought some sheets of dyed veneer 900 x 100 mm. Thanks for the info on the glue, although I can't seem to find that specific brand here in the UK. There are plenty of similar sounding products though, albeit mostly in industrial quantities with prices to match! Cascamite seems a likely option. I'd welcome some advice on how best to perform the gluing operation though. I was intending to use two backing boards and multiple clamps?
 
Pro-Glue comes in original "dark" and the new "White". I have used the "dark" because I was gluing up black veneers. I suspect either will work, as the glue line should be really really thin. In the US I get the stuff from http://vac-u-clamp.com/adhesivesandsofteners

I spread the glue with a little roller (roller is used to spread ink on woodblocks, from the art supply store) and then clamp the pile between two small sheets of Corian I have around with a number of clamps. Any smooth stiff surfaces should work. I really like kitchen counter cut-offs. Totally flat, totally stiff, and really cheap. 3/4 in. finish grade plywood would work just as well I think.
 
All my purflings are handmade....not by me though... :)
 
I did see that glue on the vac-u-clamp site. A couple of years ago I built a vacuum pump kit from Joe Woodworker. If you do enough veneer clamping, you might like using one. Very cool and efficient way to clamp stuff. The kit was fun to build, not cheap but fun.
 

Attachments

  • DSC_0161.jpg
    DSC_0161.jpg
    92.8 KB · Views: 26
Top Bottom