besley
Well-known member
I’ve been doing setups on my guitars for many years, and I thought I would share a couple of hints that may help those of you who would like to work on your own ukes.
The steps of an acoustic guitar setup are usually given as: 1) adjust truss rod to set relief, 2) adjust string height at the saddle, 3) adjust string height at the nut, and 4) adjust intonation at the saddle. Life is a bit more simple with ukes as there is rarely a truss rod, and most saddles are not compensated for intonation. So with a uke we mostly just care about string height at the nut and at the saddle.
As on a guitar I would start with adjusting the height at the saddle. But before doing that I would first measure the action at the nut. That’s because lowering the string height at the nut will affect action at the 12th fret too. If for example the action is 0.040” at the first fret, and you lower it to 0.020”, that would bring the action at the 12th fret down by half the difference, or 0.010”. If you set the action at the saddle first without keeping this in mind you could overshoot and be too low when finished. The usual way to measure this string height at the first fret is with feeler gauges. But if you’re a tool geek like me you could also invest in a nut slotting gauge which really makes these measurements easy.

http://www.stewmac.com/Luthier_Tools/Tools_by_Job/Tools_for_Nuts_and_Saddles/Nut_Slotting_Gauge.html
And for measuring string height at the 12th fret I use:

My target for action at the first fret is about 0.020”, and my target at the 12th fret is about 0.085”. So if I know I have to later lower the action at the nut by say 0.010”, I will target the saddle to give a string height at the 12th fret that is greater by half that difference, or in this case a preliminary target of 0.090” to eventually wind up at 0.085”.
You might wonder why not just set the action at the nut first? You can, but again you have to think about the effect of changing things at the other end. With a little geometry you can show that the action at the 12th fret is reduced by 50% of whatever change you make at the saddle, while that at the first fret is reduced by 5.6%. That is, if you reduce the saddle height by say 0.070” that will drop the string height by 0.035” at the 12th fret, and by 0.004” at the first fret. That 0.004” is not a lot, but it could be enough to cause a string to buzz on the first fret if you set it really low at the start.
So how do you adjust the saddle height? The common method is to draw a pencil line on the side showing how much to remove. In my example above the uke arrives with a 3.0 mm, or 0.120” string height at the 12th fret, and I want to lower it to 0.085”, so I need to remove twice 0.035” at the saddle, or 0.070”. You then sand the saddle across a flat surface (such as a granite tile) with the side of the saddle up against a block to keep the bottom square. This does work, but it’s really easy to mess it up and go too far, or to get an uneven bottom surface. And what if you want to take more off one end of the saddle than the other? I’ve seen several ukes where the string heights were not even, and I needed to remove more from one end of the saddle than the other. Doing that freehand is especially challenging.
Fortunately there is something called a sanding jig that makes this a breeze to do. I first saw a homemade one years ago called the Dickey Saddle Sanding Jig.
http://www.dickeyguitars.com/dickeyguitars/Saddlesand.html

You lightly clamp the saddle in the jig, then elevate the sides of the jig by the desired amount to be removed, push the saddle all the way down, and tighten. If done correctly you now have just the amount of the saddle to be sanded away sticking out proud of the jig. You then sand away until the block hits the sandpaper, and you’re done. The bottom is perfectly smooth, flat, square, and of the correct height. For the measurement you can use sheets of paper or business cards, anything that stacks to the proper height. And best of all is that you can switch things around to elevate one end more than the other before you tighten the jig. Say take 0.050” off one end, and 0.030” off the other.
You can make one of these for just a few dollars. Or…if you’re like me and love tools, you can buy one readymade – the Saddlemaster Saddle Sanding Jig. Here’s YouTube video showing how to use one that you can purchase on eBay.
https://www.youtube.com/watch?v=X2znwaPHhMc&feature=youtu.be
https://www.ebay.com/itm/Acoustic-g...582385?hash=item211171a971:g:KfcAAOSwX~dWpR~G
The final step is to adjust the action at the nut. There is really no easy way to do this without getting a set of purpose made nut files. I like the Gauged Nut Slotting Files made by StewMac:
http://www.stewmac.com/Luthier_Tool...ts_and_Saddles/Gauged_Nut_Slotting_Files.html
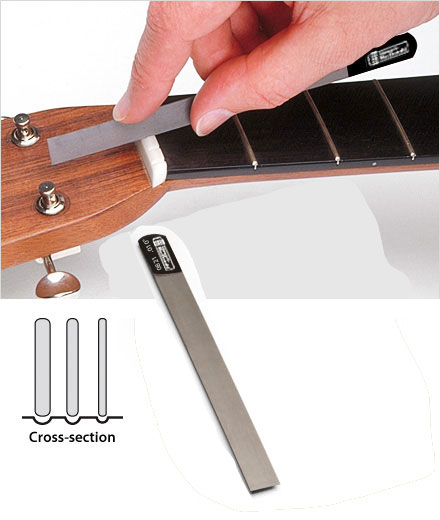
For ukulele you could probably get by with only three of them or so. These have a curved bottom profile to give you a nut slot that matches the curve of the string. What you want to avoid is using any type of file that gives you a V shaped nut slot. With a V shape the string height changes when you change string gauge with string types, or from a high G to low G. With rounded nut slots this isn’t an issue. Here of course the thing is to avoid going too deep. I just take it nice and slow, and measure often.
Of course I’ve left for another day discussion of things like being sure the frets are level, or dealing with sharp fret ends that sprout each winter.
The steps of an acoustic guitar setup are usually given as: 1) adjust truss rod to set relief, 2) adjust string height at the saddle, 3) adjust string height at the nut, and 4) adjust intonation at the saddle. Life is a bit more simple with ukes as there is rarely a truss rod, and most saddles are not compensated for intonation. So with a uke we mostly just care about string height at the nut and at the saddle.
As on a guitar I would start with adjusting the height at the saddle. But before doing that I would first measure the action at the nut. That’s because lowering the string height at the nut will affect action at the 12th fret too. If for example the action is 0.040” at the first fret, and you lower it to 0.020”, that would bring the action at the 12th fret down by half the difference, or 0.010”. If you set the action at the saddle first without keeping this in mind you could overshoot and be too low when finished. The usual way to measure this string height at the first fret is with feeler gauges. But if you’re a tool geek like me you could also invest in a nut slotting gauge which really makes these measurements easy.
http://www.stewmac.com/Luthier_Tools/Tools_by_Job/Tools_for_Nuts_and_Saddles/Nut_Slotting_Gauge.html
And for measuring string height at the 12th fret I use:
My target for action at the first fret is about 0.020”, and my target at the 12th fret is about 0.085”. So if I know I have to later lower the action at the nut by say 0.010”, I will target the saddle to give a string height at the 12th fret that is greater by half that difference, or in this case a preliminary target of 0.090” to eventually wind up at 0.085”.
You might wonder why not just set the action at the nut first? You can, but again you have to think about the effect of changing things at the other end. With a little geometry you can show that the action at the 12th fret is reduced by 50% of whatever change you make at the saddle, while that at the first fret is reduced by 5.6%. That is, if you reduce the saddle height by say 0.070” that will drop the string height by 0.035” at the 12th fret, and by 0.004” at the first fret. That 0.004” is not a lot, but it could be enough to cause a string to buzz on the first fret if you set it really low at the start.
So how do you adjust the saddle height? The common method is to draw a pencil line on the side showing how much to remove. In my example above the uke arrives with a 3.0 mm, or 0.120” string height at the 12th fret, and I want to lower it to 0.085”, so I need to remove twice 0.035” at the saddle, or 0.070”. You then sand the saddle across a flat surface (such as a granite tile) with the side of the saddle up against a block to keep the bottom square. This does work, but it’s really easy to mess it up and go too far, or to get an uneven bottom surface. And what if you want to take more off one end of the saddle than the other? I’ve seen several ukes where the string heights were not even, and I needed to remove more from one end of the saddle than the other. Doing that freehand is especially challenging.
Fortunately there is something called a sanding jig that makes this a breeze to do. I first saw a homemade one years ago called the Dickey Saddle Sanding Jig.
http://www.dickeyguitars.com/dickeyguitars/Saddlesand.html
You lightly clamp the saddle in the jig, then elevate the sides of the jig by the desired amount to be removed, push the saddle all the way down, and tighten. If done correctly you now have just the amount of the saddle to be sanded away sticking out proud of the jig. You then sand away until the block hits the sandpaper, and you’re done. The bottom is perfectly smooth, flat, square, and of the correct height. For the measurement you can use sheets of paper or business cards, anything that stacks to the proper height. And best of all is that you can switch things around to elevate one end more than the other before you tighten the jig. Say take 0.050” off one end, and 0.030” off the other.
You can make one of these for just a few dollars. Or…if you’re like me and love tools, you can buy one readymade – the Saddlemaster Saddle Sanding Jig. Here’s YouTube video showing how to use one that you can purchase on eBay.
https://www.youtube.com/watch?v=X2znwaPHhMc&feature=youtu.be
https://www.ebay.com/itm/Acoustic-g...582385?hash=item211171a971:g:KfcAAOSwX~dWpR~G
The final step is to adjust the action at the nut. There is really no easy way to do this without getting a set of purpose made nut files. I like the Gauged Nut Slotting Files made by StewMac:
http://www.stewmac.com/Luthier_Tool...ts_and_Saddles/Gauged_Nut_Slotting_Files.html
For ukulele you could probably get by with only three of them or so. These have a curved bottom profile to give you a nut slot that matches the curve of the string. What you want to avoid is using any type of file that gives you a V shaped nut slot. With a V shape the string height changes when you change string gauge with string types, or from a high G to low G. With rounded nut slots this isn’t an issue. Here of course the thing is to avoid going too deep. I just take it nice and slow, and measure often.
Of course I’ve left for another day discussion of things like being sure the frets are level, or dealing with sharp fret ends that sprout each winter.
Last edited:
")


