Bolt on method: Matching your ukulele neck to body

Matt Clara

UU VIP
UU VIP
Joined
Aug 3, 2009
Messages
1,640
Reaction score
15
Location
Lansing, Michigan
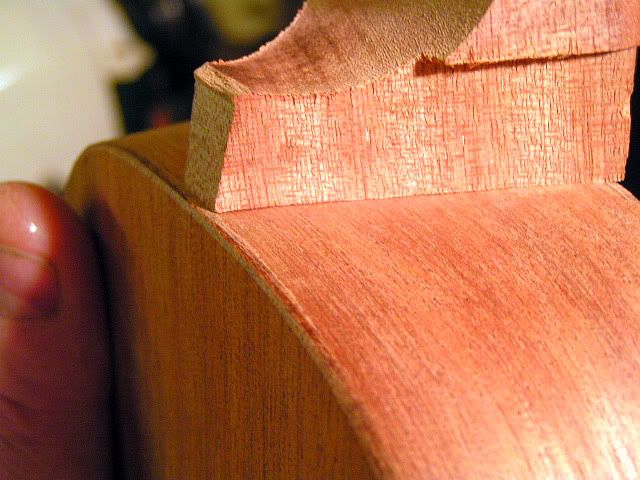
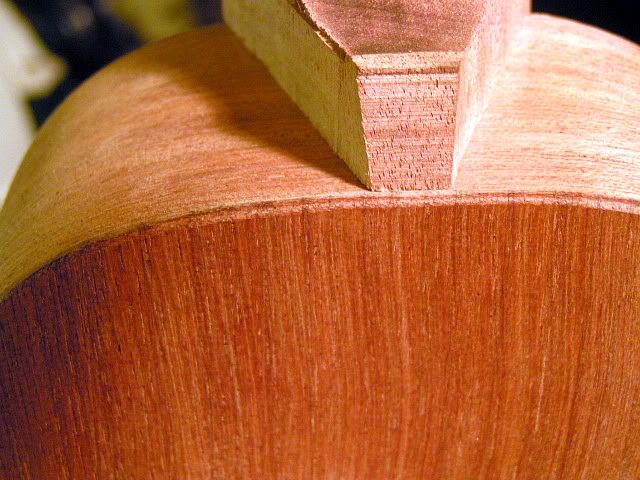
I've been struggling to match my uke necks to my uke bodies--I'm on my second one, and it's mating even more poorly than my first one did. I haven't attached it permanently yet, but I bet I'm three hours into patiently sanding it, and I'm all out of patience. I've been simply taping sandpaper to the uke body and then carefully/meticulously scooting the neck back and forth on it, along the line of the joined sides (back and forth as opposed to side to side). I can get it looking good, but not perfect. I'm hoping some of you can share your more successful methods of creating a seamless join here.

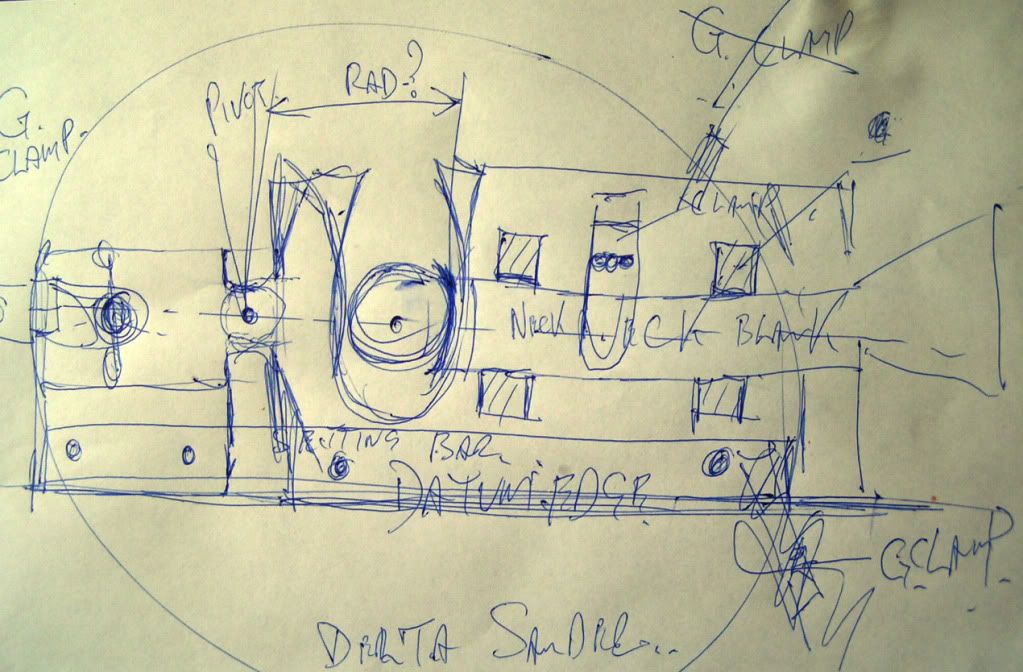
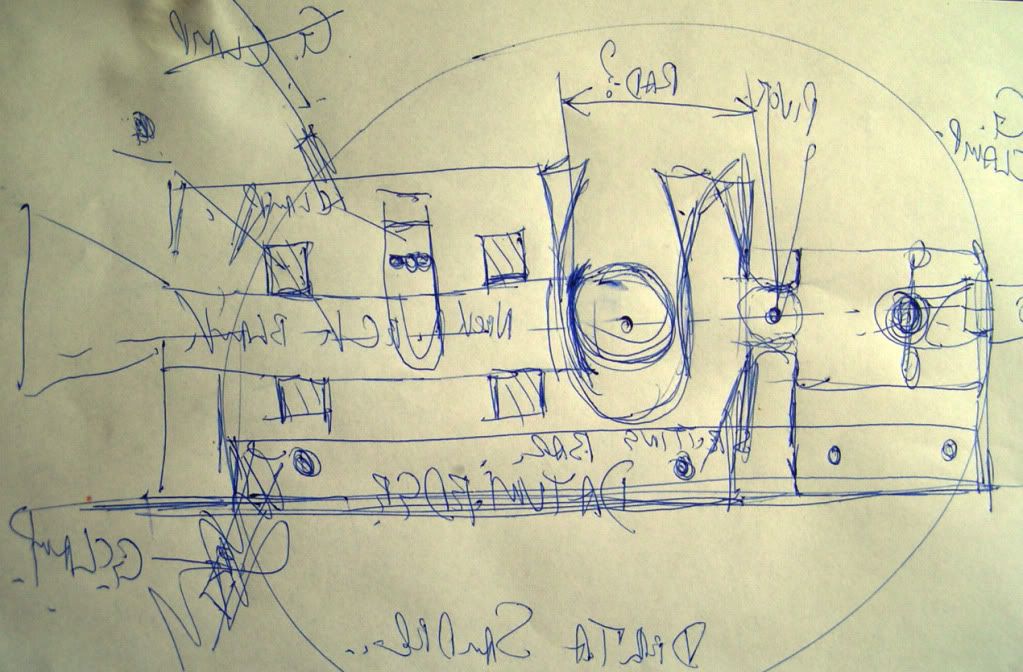
In the meanwhile, I'm designing a new uke form with 2.5 inches of FLAT across the neck join area.
 
I tape two pieces of paper together end to end and draw a straight line down the middle. Then I lay the ukulele top down on the paper so that the centerline of the instrument matches up to the line drawn on the paper. I then cut the paper along the perimeter of the neck block using a sharp razor blade. That gives me the shape of the body. I then line that up on the centerline of the neck and sand to the line using a spindle sander.
 

Attachments

  • Picture2.jpg
    Picture2.jpg
    47.4 KB · Views: 230
  • Picture1.jpg
    Picture1.jpg
    53.3 KB · Views: 197
Hey, Matt. I know exactly what you mean. Seems like you spend all day on it, you correct a little one way, it goes off the other way, too round here, too flat there, too concave here... I can't say we've found the secret formula, but here are two things we've tried that have helped to some degree:

  • Start with a concave cut on the neck and go a little "deeper" (i.e. more concave) than you need to. For us it was easier to get it right if the edges are in place from the start and you sand towards the middle. Sanding away from the middle (with a flat-cut neck) we ended up with a lot more back-and-forth correction and it took a lot longer...
  • Make the neck blank a little longer than you normally would. Then cut the curve the way it needs to be and use the cut-off piece as the head block. The two curves then end up pressing exactly back where they came from. Problem is you have to get a really good cut so that the slope of the top is right on both sides.

This has provided some relief, but I'm sure there are others that have figured out more dependable methods.
 
Last edited:
Matt, this is what Ive boiled it down to for me. Sand sand sand then frustration. No more. I put the body and neck on my bench. I sand and sand for a while or until I get sick of it. Then I walk away. Next day or so Im sanding again. Sometimes I will hit it again the evening but I keep the neck and body on the bench ready for five min. of sanding if I feel like it.
Takes a few days but a little at a time.
I tried to hurry one time and I got so frustrated I messed it up.

Good luck on number two.
Dan
 
Hey Matt, I use a sandpaper rub to match my necks to the body and it seldom takes me more than 15 minutes, 20 if I'm being fussy. A couple of ideas, first use a stick on sandpaper, I use the 3M stick on rolls from Stew-Mac. There is always some slippage with taped on paper and that is inefficient. If you don't want to buy a whole stick on roll, try the stick on sanding disks for electric sanders, you can cut them to shape and they are big enough to work. Second, you need to be fairly close before you start sanding. I use a contour guage and a 6 x 48 belt sander and a Dremel with a sanding drum to get close first. Erich's suggestion of hollowing the center of the neck slightly is a good one, the Dremel works well for this. Hollow it out a touch, sand for a bit, as you start to sand into the center again, hollow it a bit more. You should not be sanding on the whole end until right before being done. Like everything else, it takes some practice, but I much prefer the look of rounded shoulders to flat ones.

Brad
 
If the mating surfaces are flat I use a block plane... if they are curved I use my overarm router and a dedicated jig - maybe I'll video it. After spraying I squeeze the neck and body together sandwiching some sandpaper and pull that through for a final mating surface. I also relieve the central area of the mating surface of the heel so that if I need to sand, I am only sand 5mm of surface and not 45mm! Simple....

Oh and I sand the ribs slightly concave with a 22' radius block....
 
Last edited:
When you guys relieve the central area of the mating surface, do you then try to sand the edges down until the relief is gone, or do you leave some space in there and not worry about it? On my second neck, I did figure, as Pete more or less says, it would be easier to sand the edges to meet the middle than the middle to meet the edges, so I used the curved part of my stationary belt sander to carve away the middle, but found I went further than I intended and then spent a lot of time sanding the edges until the central relief was flat with the body, only to find my edges, in particular the corners just under the fretboard, no longer mated perfectly.
 
Only the edges need to touch - look at a Martin dovetail for the example of this.
 
For a bolt on neck some gap in the middle is OK. Because I'm gluing on the neck, I want the whole surface to match.

Brad
 
I machine mine down on the bandsaw early in manufacture with a special set up.. and only a little dressing is required afterwards..but these are dovetail joints..but I also leave a little space away from the edges so they can set firm ... some still go wrong tho' and give me problems.
PICT4645.jpg

PICT4646.jpg

PICT4648.jpg
 
This definitely can be one of the more frustrating aspects of building. Dave Means shared with me one of his early methods and that's what I've been using to date. The jig consists of a platform with a centerline. A groove is cut to match the thickness of a piece of plexi that will be attached to the neck. The groove is cut first and the centerline established and then transferred to the platform. The centerline is scribed into the plexi. Align the plexi on the centerline of the neck and attach it with double stick tape. The plexi slides back and forth in the groove and I use one hand to apply steady pressure pushing the heel up against the body and pulling a piece of sandpaper through. Usually takes me about 30 minutes or so to get a good fit. And that's after routing out a relief in the end of the heel with the dremel. See pic of heel with cross dowel installed. This is a scrap neck. It's not the one going on this mahagony tenor.

Still not the utlimate way to do it but it does work. Still requires a little fussing. I use a couple of spool clamps to keep the body in place on the center line. Small shims are necessary at each side of the lower bout due to the radius of the soundboard. I use a flat cross brace on the upper part of the soundboard so that part is flat and doesn't require any shimming.

Regards,

neck_joint_jig1.JPG

heel_relief.JPG

neck_jig_plexi.JPG

neck_jig_2.JPG
 
There is one problem with the sanding method - the paper is never 'flat'. I use Norton 3X from Lee Valley. It is thin and best of all, it lies flat. However, the secret is the ribs - as I said I make this area very slightly hollow. When you pull up the neck, the cheeks/shoulders of the heel lie flat. You can also shimmy the ribs to help with alignment. Do this before you bind and when you bind, always scape back - don't sand....
 
Last edited:
I'm no Draughtsman..but I made this sketch of a device that should do this Job ..it theoretically should work on a spindle sander or a drill press.Ive not built it yet..maybe someone will have a go and let me know if it works.
PICT6270.jpg
 
That would work or a huge 'drum' to the radius of the upper bout mounted in a drill press- I believe this is how Kevin Hall used to do it...
 
I'm no Draughtsman..but I made this sketch of a device that should do this Job ..it theoretically should work on a spindle sander or a drill press.Ive not built it yet..maybe someone will have a go and let me know if it works.

I'm no draughtsman, either, but even I can understand that--very clever!
 
Top Bottom