fahrner
Well-known member
These are all tenors if that's what you mean?The size of the ukulele matters as well...
Last edited:
These are all tenors if that's what you mean?The size of the ukulele matters as well...
in what situations would you want to only have the arch in one direction?
My assumption here is that the domed radius is stronger in all directions where the second fixture you describe puts strength in only one axis.
The second method looks a lot simpler.
Thanks Dave.Well, I suppose that the arched top puts the strength in the direction that the strings are pulling. I'm no expert, I haven't made enough instruments yet, but from what I've seen and read on various forums some top luthiers use this method (Howard Klepper, Stephan Sobell...) I believe Chuck makes arched tops (I'm not sure 'arched' is the right word) and I'm sure he could explain why better than I can.
Then there are the guys who break the rules and make perfectly flat tops. People like Jim Olson who makes James Taylor's guitars. (A standard JT signature model, he's only making 80, will cost you $15,000. The 20 more expensive special models have already been sold!)
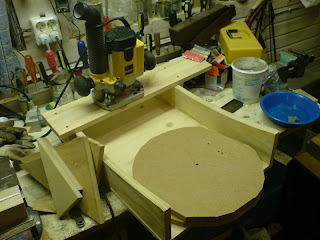
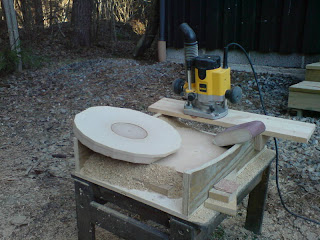
The sanding board/trough-thingy is a bit simpler to make. Basically a support at each edge and a row of screws down the middle. What's not so simple is sanding the braces. In fact, I made a sort of simple sled to which I attached the braces and slid it along the board a few times.
For fronts I just use a simple jig plate (pinched off Pete)What do you use, Timbuck?
")
arched back and top? You guys are killing me. I just finished building my first pair of ukes by the Hana Lima plans and they stressed getting things flat and I sweated that detail now you are telling me I gotta take it to a whole new level of complexity
thanks guys! lol