Is this Top Underbraced?

sequoia

Well-known member
Joined
Oct 22, 2014
Messages
3,358
Reaction score
513
Location
Little River, California
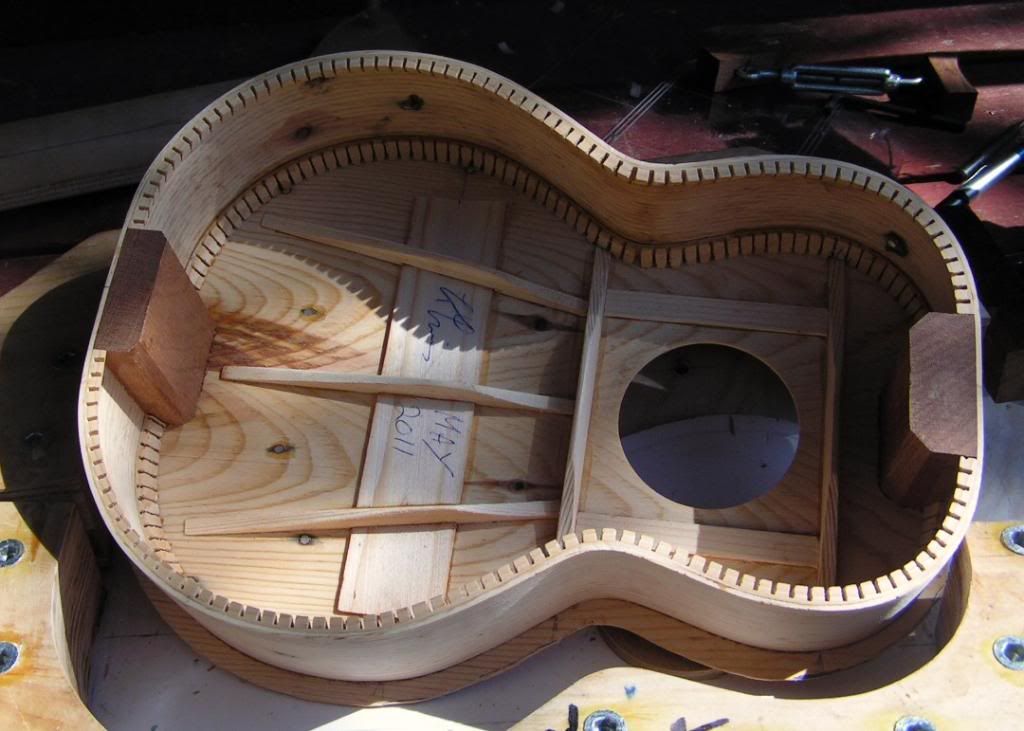
I'm putting on a redwood top on a smashed tenor ukulele as a sort of side reclaimation project and decided on this bracing scheme. I've decided to follow Pete's adage to Build Light! as a sort of experiment to see how light is too light.

DSCN5851.jpg

The top is about <75 thick (<2.0 mm). The "fan" spruce bracing is 3/16 thick and 5/32 high. Pretty thin. The bridge plate is 3/32 thick. I'm not concerned with the two cross-braces on the upper bout, but only with the lower bout bracing. The braces in the picture are not glued in or final scalloped. I think the scheme might be OK, but I'm becoming concerned with the possibility of the bridge dipping down and forward. NOT a good thing. Could just be paranoia I don't know.

I know enough about bracing theory to know that I don't really know anything about it. More black-magic with a touch of hocus-pocus. However, I thought I might put in two struts in front of the bridge plate to cool my mind. Something just tells me this is a bad idea (red line in picture below). I will probably just go with it as is unless someone says, "STOP! UNDERBRACED! STOP!".

top1.jpg

The repaired body awaiting its new top and fretboard... Still a lot of work to do.

DSCN5852.jpg
 
Last edited:
id say its over braced. Especially the bridge plate.
Make the peak of the the brace in the middle(ish) of the lower transverse bar and the bridge., then behind this peak evenly taper down the braces to nothing at the butt end.

ALso, you could bright the outside braces in a little so they are not fanning out as quite so much- just a bit.

I put the outside braces under the bridge wings

Hope that helps a bit :)
 
Not underbraced at all, IMO. Looks like a pretty standard fan bracing system to me. For a lighter bracing scheme, look at Kanile'a Tru Bracing system -- no bridge patch and tone bars connect to soundboard only at their ends.
 
Top could be reduced by .2mm. Put a radius in the front and reduce the width of your bridge plate to +6mm on the width of the bridge giving 3mm front and back. Bridge plate should be 1.6mm and the braces 6mm square tapering as suggested by Beau. North of soundhole brace flat, south of it, radiused. This has a significant bearing on response, sustain and tone...
 
North of soundhole brace flat, south of it, radiused. This has a significant bearing on response, sustain and tone...

Hmmm... very interesting Pete. Oh, and the cross braces in the picture at the waist and upper bout are just raw and have not been worked with and will be taken down and scolloped being much, much smaller later. They are just there in the picture showing where they will go. And the suggestion of straightening out the fan bracing is a good one by Beau.

Now as to Pete's idea of radiusing the brace south of the soundhole: I hear you Pete, but doing that brings in more issues than this inexperienced builder can cope with at the moment (bridge, fretboard, etc.). A good idea but at this time I have plenty enough to keep my mind spinning with a flat top. I'm learning not to overreach my capabilities. Stay within yourself. A lesson learned everyday. Maybe someday, but not now Pete. Oh, I do radius the back braces of course. Not so many issues there except binding and I don't bind my backs.
 
It's a simple task that will give you all the things you are looking for. I can't understand your reluctance to try it...
 
Looks way over braced to me as well. That bridge patch is massive. I don't mind that the top is 2.0mm thick as long as your fan braces are sized appropriately, and none of us could really say for sure unless we had that top in our hands to flex it.

I keep the outside braces just inside the outer edges of my bridge. So with a bridge say at 100 total width, the outer braces are 40mm on each side of the centre line. Conversion point at the centre line of the instrument at where the nut would meets the fret board.
 
I think you have a good opportunity here to brace the top based on “flexing”. Since you have a built body, you can temporarily clamp the top on and see how much deflexion you’re getting at the bridge location. You can progressively thin the bracing until you get the right amount of flex. Since every piece of wood is different, no one can really say just what the measurements or thickness should be. Flexing the top will give you a “feel” for your bracing. Soon enough it will become more intuitive for you.
 
Temporarily clamping the top won't give you an accurate indication of how much movement you'll have in it. It's much better to test the deflection once the top is glued onto the sides. I make my final bracing adjustments just before I glue the back on.
 
It's much better to test the deflection once the top is glued onto the sides. I make my final bracing adjustments just before I glue the back on.

Oh... A small light bulb just went off in my head. What a concept. Never thought of that... The question is: How much deflection is the right amount of deflection? Oh no! Could this be another learning curve???...

By the way, this piece of wood can't be taken down any thinner. It just isn't stiff enough and is acting like a softwood and has reached its limit. I'm tellin' ya, this redwood is neither fish nor fowl. I'm stickin' a fork in it. It is done....

Yes, the bridge plate is pretty massive at 3/32. The thinking behind this is that redwood being a soft straight grained wood can really start to cup around the front side of the bridge and dig in under tension. This is a structural decision which has to take precedence over sound issues in the end. The compromise issue. The instrument has to be able last, just not sound good for three months and then go hayire. Anyway, that's what up with the massive bridge plate in my inexperienced mind.

The remedy to that situation is proper bracing not a thicker bridge patch.
 
This is a common case of I'll ask the experts, ignore their advice and spend time here justifying my poor decisions. So
rry but someone has to say it...
 
When I built a Tenor uke from some old pallet wood (the worst and cheapest flat sawn timber available) I built the top with linings bracing and bridge patch of the same pallet wood...The bracing pattern was kindly given to me by Pete Howlett ..and to cut a long story short it turned out to be one of the best sounding ukes i've ever made..I liked it so much that I made another one just for myself to play... and I still play it every day co's I luv it :D
PICT0014.jpg
 
I'm not concerned with the two cross-braces on the upper bout

I like to build in greater stiffness in the upper bout. The heel brace has to support downward pressure from the fretboard and the waist brace has to support torqueing pressure from the bridge. I've seen a lot of ukes where the top is concave under the end of the fret board and/or concave around the sound hole. My experience tells me that a weak waist brace will tend to dampen sound and cause unnecessary top distortion. In the lower bout I agree that the bridge patch is not needed and would recommend removing all the bracing and patch to start over without it.
 
Top Bottom