For the tear drop builders.

Michael N.

Well-known member
Joined
May 23, 2010
Messages
1,140
Reaction score
1
Location
UK
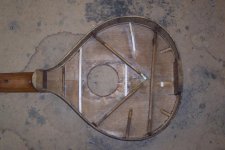
In the workshop for extensive restoration. A Cittern type instrument (actually a so called English Guittar). I've seen a few people on here who make Ukes based on a similar shape. I'm quite fond of the tear drop instruments.
This dates from around 1750. Not in the best of condition, has seen some very amateur repairs as well as tube after tube of the dreadful superglue.
The central rose is rather attractive. Made of bone, Ebony and Pearwood. Interestingly the purfling and soundhole inlay is inked on. prestonrose.jpgcittern1.jpg
 
Last edited:
As a fan of the teardrop design, thanks for posting the photos of this old instrument, especially the rather interesting brace layout. Enjoy the restoration!

Bob
 
Fascinating to look into that old bracing. I just love this stuff. What are my ukes gonna look like in 200 hundred years. Ha! Probably firewood...Frankly the uke looks like a mess to me. After that many years no wonder but some parts have appeared to have fallen off and/or moved. I'm just wondering if you plan to square things up and add the missing braces. Will that change the sound?
 
The braces are now back to original configuration. The real difficulty is replacing the tiny hitch pins (they are bone and make bridge pins look enormous), the broken pieces to the rose and removing all that superglue.
I've made 2 hitch pins, they took 2 hours to make! Only another 8 to go. I've ordered some plain Bone bridge pins, which should give me a head start and speed things up considerably. One of those tiny watchmakers lathes seems to be the appropriate tool. Bit too expensive, just to make a few pins though.

hitch1.jpg
 
There are a few cracks to deal with. A couple on the front and a couple on the Back. This one on the front is actually one long crack but it looks like it's two separate cracks. Probably best to deal with it as two separate cracks. The bash it's received at the side of this crack, which must be what caused the crack in the first place, is much more difficult to sort out. It really requires a patch, inserted from the inside. A little like how they do Violin soundpost patches. It's very exacting work, time consuming and would require removing one of the diagonal braces. I'll probably fix that as best I can without going to such lengths. There's enough work required elsewhere. Every Peg needs replacing and all 10 peg holes need bushing. The original frets are extremely narrow, made of Brass and just 0.7 mm's in width. Of course they are bar frets. I've found that if I use mandolin wire, file off the shoulder and hit the side with a hammer it gets it to near 0.7 mm. Not only that but hitting it with a hammer sends the fretwire into a curve that matches the camber on the fretboard! That's very handy because the camber on this fretboard is pretty extreme.
000_0012.jpg
 
Here you are Sequoia, back to something very near to the original bracing. It's not too difficult because of course you have the shadow marks of the original positions. Many of the old instruments show quite a hurried approach. They didn't really bother with glue clean up or making everything precise. Pretty much everything is left from the blade of the Plane or chisel. You can quite clearly see all the toothing marks on the internal surface of the Back of this instrument, so they didn't even bother to scrape the toothing marks away. They had a living to make, mouths to feed and a public hungry for their wares.
This one will have come from a 'workshop', so not an individual maker but a workshop that was producing different types of instruments. That was common. In fact the individual maker working alone was probably fairly rare. That's more of a 20 th century concept. Most were apprenticed at a young age or jobbing craftsmen.
This particular one was made by Preston, who also made Guitars and Violins. No doubt he made other instruments too.

bracing.jpg
 
Last edited:
Very interesting work Michael.

I was lucky to come across and to purchase a Schaublin 70 lathe a couple of years ago. Just the thing to add to the luthiers workshop. Those hitch pins would be dead easy to produce on it.
 
I actually have two lathes. A basic (but reasonable) woodworking lathe that is 24" between centres and a pretty small metalworking lathe. I don't know who made the metalworking lathe but it's obviously fairly old. They are both in storage. My friend used to make wooden friction Pegs on it. If I could get a Jacobs chuck to fit the metal lathe I don't think I'll have much trouble. I'm much more accustomed to working between centres on a woodworking lathe than using a cross slide. I don't fancy getting my knuckles caught on the universal chuck. I can buy Bone rod at 10 mm diameter, which means a huge amount of wastage but that's the thinnest stuff that I can find. It's reasonably cheap though. I'm surprised I can't find it in smaller diameters but perhaps Pearl and plastic are much more popular for making fretboard dots.
 
If you squint your eyes you can almost X bracing. Maybe the builder was onto something, but didn't know it.
 
Last edited:
Yes, I had the same thought. In fact I've seen another of this type (different maker) that had an actual X brace. I don't know is if it was original or a later addition. The X brace certainly pre dates Martin, that is for certain.
These are metal strung instruments though, just not at the same tension as a steel string guitar.
Here's another by the same maker, probably a later date. Mine has friction Pegs whilst hers has the later Clock key tuners. The clock key tuner was supposedly a Preston invention. It's a threaded rod with a hook that the strings attach to. You turn it with a clock key and the hook slides along a slot. It's very similar to the way that a Violin bow frog adjustment works. Lose the key and your done for. . . at least until you can get a replacement!
Has kind of a dulcimer tone to it:

https://www.youtube.com/watch?v=8WsX2A4RlLE

These Guittars were popular from about 1750 through to 1850, when they promptly died a death - at least in England. The Portuguese have a similar instrument (supposedly based on the English guittar) and the Germans have their Waldzithers. They are all very similar instruments but differ in tuning, number of strings and the way in which they are played.
 
Last edited:
Here you are Sequoia, back to something very near to the original bracing.

Thanks for the picture Michael. I'm no historical bracing expert, but that is really nice braceing for the 1750's. I'm looking at that far south transverse brace and it is definitely asymetrical meaning they were getting that sound needed to be offset. Either that or the guy really got it out of line and said, to hell with it, time for lunch! That the instrument survived this long probably means it sounds fantastic. Thanks for sharing the restoration pictures. How is it going removing all that gloopy CA?
 
That wonky bar was certainly deliberate. It also makes an appearance in Romantic Guitars around 1800 and onwards.
CA is really terrible to remove, very time consuming. Should never, ever be used on instruments of this nature.
 
Michael, thanks for posting these photos. Its really interesting to see how things are built whether they are new or old. Its also interesting to see how you are repairing this. I hope you will post a photo of the completed instrument. The Youtube clip sounds great.
 
Back repaired. The six odd looking Spruce things are crack closing posts, they take the small modelmakers alloy clamps. The posts themselves are pared away after the crack is repaired. This crack wouldn't fully close so it also had to have a very thin splint inserted.
One of the braces has also had a splint inserted. The original had a long crack that had been filled with Superglue. Rather than throw the brace away or try to remove all the Superglue I simply used a very fine Japanese saw to cut down the crack. That cleaned up the crack and removed the superglue in one go! Then I inserted the splint. One of the old braces couldn't be saved, it had multiple cracks. Every brace had to be removed and reglued. The Back had enormous amounts of superglue on it. I'm traumatised by that glue.

Here's a very good procedure for doing Peg holes that are worn and need bushing, might be good for old friction Peg Ukes. At one time I used wooden bushings but now favour these spiral or paper types. The Violin repairers use Manila or the Brown parcel paper. You take an over length Peg/Mandrel that is much smaller than the hole that you want to bush. The Peg has to be waxed very well otherwise you may have trouble removing the paper bush. Usually it takes 3 or 4 turns of the paper around the Peg, gluing the paper as you go. Some use Titebond but I use Hide glue. It's all a bit messy and sticky. Then the whole thing is left to dry on this Peg, although I suppose you can go right ahead and just glue it into the hole that you want to bush. Once it has dried the Mandrel is removed and the paper bush is trimmed back flush to the wood. The new Pegs are then fitted as normal.
The nice thing about this method is that you don't need to remove a lot of material on the old hole. Just enough to get a clean gluing contact. When the paper bushing wears down it's simply a matter of removing it and inserting another. They are strong. Paper dowsed in glue (especially Hide) makes for a pretty strong combination.
I have 10 such bushings to do on this instrument + it requires new Pegs. Two of the original Pegs snapped when I first tried to turn them. The wood on them is obviously very old and brittle.

backrestore.jpgpegbush.jpg
 
Top Bottom