Ladder braced Uke.

Michael N.

Well-known member
Joined
May 23, 2010
Messages
1,140
Reaction score
1
Location
UK
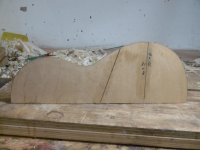
By popular demand (hard to resist the clamour of the masses): The ladder braced Tenor uke.
I've designed it so that it shows some resemblance to ladder braced 19th century guitars, which can be a bit curvy in the body. Scale length seems to suggest that mine will have 12 frets to the body joint, otherwise the bridge position moves too far north of the bracing and ends up looking like many steel string guitars. You see that kind of thing on many 14 fret tenor ukes, the bridge relatively close to the soundhole. I'm staying with 12, which is the standard for many gut/nylon strung instruments anyway. It also keeps my bracing in a similar position relative to 19 th century guitars.
I've designed a number of instruments from scratch and the scale length is the obvious starting point. The rest is just about determining body length, lower and upper bout width, width of the waist and it's position. After that it's just a matter of drawing fair curves and trying to avoid flat or awkward looking curves. Having said all that there's a fair amount of latitude in this sort of thing, as evidenced by the plethora of body shapes that you see on all sorts of instruments. I think some are a bit more graceful than others though.
 

Attachments

  • uke1a.jpg
    uke1a.jpg
    85.5 KB · Views: 313
Last edited:
European spruce soundboard. I decided to omit the usual harmonic bar just below the soundhole, I thought it overkill considering that the diagonal bar resists the rotational force of the bridge.
The neck joint will be the same as the shallow mortice joint found on violins and romantic guitars.

uke1.jpg
 
Back/Sides will be of walnut. The soundboard linings are the Spanish individual block method. It kind of suits making without the use of a mould. I just dabbed spots of superglue on the juncture between the outside of the sides and the soundboard. Kind of like spot welding, just enough to keep it in shape. The lining blocks are then glued with HHG. It's a one off method, otherwise I'm much more of a fan of the outside mould in which case the lining blocks can be substituted for kerfed or solid linings - as I've used for the back.
Soundboards are normally built flat with ladder bracing, backs are domed.
This is the current state of the build. I'll get the back glued tomorrow and hopefully sometime next week I'll find time to start making the neck.

uke2.jpg

uke3.jpg

uke4.jpg
 
Last edited:
This is great to watch, Michael. Thanks for posting. When gluing the linings without a form, how much concern do you have for, and how do you control, keeping the sides perpendicular to the top?

Nelson
 
Well you have highlighted the real problem with this method, twist or racking can be very problematic. The sides need to be bent accurately and you have to keep a very close watch on how the two bouts of the sides line up. If they are way out you are in trouble, a slight twist and you can make corrections.
To be honest I wouldn't recommend this method other than for prototypes/development models. An outer form doesn't take that long to make, it doesn't have to be the full height of the sides either. It does make things much easier and it eliminates some of the risks. Certainly if this ever became a commercial proposition the first thing that I would do is to make a mould.
 
Its good to watch you put this together. How thick did you make the top? I note the grain orientation of your end blocks-mine are usually vertical. I see there's no bridge patch and I guess you'll use a classical guitar style bridge. It will certainly be interesting to find out how it sounds.
 
Soundboard is 2 mm's and a little less. I vary the thickness across the width of the lower bout. Around the soundhole and towards the top block it is thicker. I don't think that area contributes much to the sound. With the upper harmonic bar, soundhole reinforcement and fretboard it's all pretty rigid there anyway.
BTW the soundboard is 3 piece or rather one wide piece and two small wings. That's not a bad idea if you are using a hand plane to thickness because you aren't fighting with the grain runout of a bookmatch. The back is one piece, again easier to thickness for the same reason.
No bridge patch. I would have used a thin standard 0.6 mm maple veneer patch if I had gone with bridge pins. I contemplated bridge pins. Really, I could have flipped a coin on which style of bridge to go for. . . there's always a chance the next one will have pins.
As for sound? Well , I'm not sure. It should work pretty well going by other larger instruments that employ ladder bracing - romantic guitars and the lute. One criticism often aimed at romantic guitars is the lack of depth to the bass. That's not an issue on a uke. It's a matter of trying it though. I like to think of it as a guess, an educated guess rather than a stab in the dark guess. Time will tell.
 
Is the kerfed lining in there a series of individual blocks, each mounted individually, or a strip cut "special" to have thinner blocks at the waist? I'm assuming the raised ones over the braces were put in manually, I'm just curious if they all were, particularly with the change up in block size at the waist.
 
Every one is an individual block, each glued separately. The Spanish refer to them as tentellones or dentellones, I guess they resemble teeth.
It's a little tedious gluing them in, there certainly are faster methods. The blocks at the waist have to be smaller (narrower) because they are going around a much tighter curve. Half the block wouldn't be touching the side if you glued a wide one at the waist area. Again it's really a product of the method. The Spanish use this method with the slipper foot. Frequently they use something like an awl to position each block. Each block has a stab hole, the sign that they've used an awl to position and glue them in. Some can look a bit rough and ready. I glue them in the sequence that they are sawn off the strip of wood, others just mix them up and they can all look a little disjointed.
My preference is for solid linings top and bottom, I think they look a lot neater. They are much harder to get a good fit though, easy to get gaps with solid linings. If I was using a mould I would certainly go for solid rather than kerfed or individual blocks. Not that it makes much or any difference to the sound (as some claim). It's just a craftsman thing and I like the appearance of solid linings. Anything much above 2.5 mm thick and they can be a nightmare to bend. This is where you need friendly wood and zero short grain.
 
Last edited:
Well you have highlighted the real problem with this method, twist or racking can be very problematic. The sides need to be bent accurately and you have to keep a very close watch on how the two bouts of the sides line up. If they are way out you are in trouble.

This is great Michael! I'm looking forward to how it sounds in the end... Your quote is quite well said. Yup. Racking can be problematic. Also depends on how wet you bent the sides I've found. really wet wood wants to rack and make that annoying pocket just south of the waist. Best keep things dry. But you know what? In the end nobody notices and the uke is just fine. Just have to watch when routing in the bindings. I'm guessing there ain't no bindings on this uke.

By the way, did you say what the scale length and the length of the body was in the end? I might have missed that.
 
Body length is 31 cm's, not including the back button. Scale length is 45 cm's.
Bindings? Probably none on the back but given that it's a spruce top it's a good idea to fit bindings to the soundboard otherwise over time the edges can take some heavy wear or knocks. If it was a hardwood top then there's really no need other than for reasons of appearance. Even though this is somewhat experimental I do hope to get a usable uke at the end of it all. Not only that but if the ladder bracing doesn't work then the back will be removed and I'll chisel out the bracing and replace it with a few fan braces. I've done that before on an experimental guitar. In fact after I removed the ladder bracing on it I started gluing braces on the outside of the soundboard. It looked a real mess but it was a good way of trying different ideas.


Back is on and trimmed to the sides. A touch of refining is needed to the upper bout but that can be done if it ever makes it as a commercial proposition. As it is there's a slight flat area or rather an area where the curve looks a touch awkward. It's what development models are all about.
I've also decided that the bridge will have pins after all.
Next, on to the soundboard banding and end graft, which will be from the black 5,500 year old!!! bog oak.
 
Last edited:
I'm not seeing any awkward curves on the upper bout, but it might be the photograph. My awkward curves come just south of the waist on the lower bout where things tend to straighten out. Tends to give that pear shaped look like a women with a...a large rear if you know what I mean... Looking forward to seeing the old bog oak end graft.
 
Doesn't show on that photo. Top bout, around the 10 to 2 position. It's very slight, perhaps only 1 mm adding on to the template to fill it out a touch. In fact I wouldn't bother altering the template, just alter it on any future mould.
I use the bog oak a lot these days, bindings and fretboards. Ebony (especially sanding it) makes me react, fits of sneezing. It's the only wood that I know of that I've become sensitised to and even ebony I was OK with for the best part of 25 years. Things change.
 
Binding and purfling on. Rosette almost done. I have a central band in the rosette that is empty. I can either go for a simple coloured band or put in some sort of braid. . . . to be decided.
There's also a couple of coats of oil varnish on the back/sides. It's not really the finish, just a method of filling the pores of the walnut. Good time to do it whilst the neck, fretboard and bridge still has to be made. Unfortunately the neck will have to wait for at least a few days whilst I attend to other builds.

 
Love the uke... Hate the towel. So blue. But who cares?... Looking forward to how this thing sounds. Walnut is such a great choice for sides and back.
 
Excuse me. That towel had a former life, although now it's a reformed character.

https://www.youtube.com/watch?v=p2YnBp6bsFQ

I only watched South Park when Towelie was in it, otherwise it did nothing for me.
Now he's protecting my instruments from picking up dirt, scratches and dents. Towelie really likes Walnut too but he told me to put a bit of red in the varnish to give it a slightly warmer look. I listen to Towelie all the time.
 
that youtube clip certainly sheds some light on the cause of the stain in the top of your picture... :)
 
Top Bottom