Build #3, Log

cml

Well-known member
Joined
Jan 13, 2016
Messages
1,060
Reaction score
0
Location
Sweden
By popular demand, well at least Dan asked for it, here's a new build-along thread.

This will be my second acoustic uke, third uke in total. It'll be another tenor, because my last one has deformed a little due to being under-braced. It's now got a nice little pot belly. The sound's still there, but it annoys the crap out of me.

Likely specs will be,
Bird's eye maple sides and back
Spruce top
Mahogny neck
Groover tuners.

I'm leaning towards a low-g build, since my KoAloha is fantastic with high-g.

Fair warning, this will be a sloooow build and log. I simply dont have much time these days. But I figure, if I can get one task done every week, I'll be happy and sooner or later I'll have a new uke!

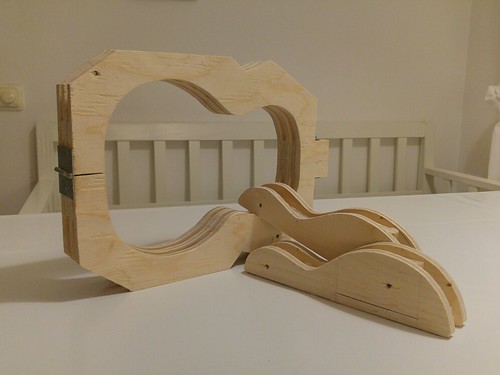
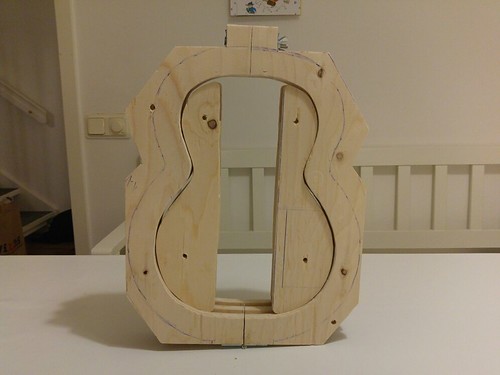
Today's task was making a better mold. Last time I used a fixture, and while it worked, I wanted something a little more accurate this time. Inspired by Dan, this is done in layers. I dont have a bandsaw, or laser cutter, so this is done with my trusted hacksaw. Who needs a bandsaw anway...?! (how I wish I had a bandsaw)

Here's the results, pretty happy with it. Full length cauls were made as well.
31303966624_e636039161.jpg

31996780292_64e34cc056.jpg


//CML
 
I'm looking forward to this, even if it takes all year!

The form looks nice and solid. Did you use blocks of ply between the layers to space them out?

I dont have a bandsaw, or laser cutter, so this is done with my trusted hacksaw. Who needs a bandsaw anway...?!

Reminds me of Monty Python's four Yorkshiremen.

"A hacksaw? Lucky! When I started building I lived in a dust extractor and spent seventeen hours a day cutting forms out of plate steel and all I had was a piece of wet string and a ball of wax to do it with." Or something.

Tell you what, if I can't get my bandsaw working this week, I swear I'm going to drop it off a cliff. So there's a chance (however slim) that a bandsaw might wash up on a beach in Sweden. Keep an eye out. :D
 
I dont have a bandsaw, or laser cutter, so this is done with my trusted hacksaw. Who needs a bandsaw anway...?! (how I wish I had a bandsaw)

I'm impressed. You did that with a hacksaw??? I'll bet your arm got really tired. I'm pretty patient sometimes with hand tools, but I'm pretty sure I'm not that patient... Keep us posted.
 
Nah, this was fairly easy work for the hacksaw, plywood cuts easily even triplestacked to 36mm. It was actually easier than I thought!

The mold is 60mm, 3 layers stacked with plywood blocks in between just as you wrote Dan. Aiming at about 75mm height for the build.
 
I really enjoyed your #1 and #2 builds and you've got me subscribed now to this one too...

Sounds like you've got an eye for incremental improvements.

Maybe the application and execution could be the sticky bits, but I think you've got this and will turn out another work of musical art regardless of the obstacles. :rock:

Your build logs are cool to watch/read. Thanks for sharing! :bowdown: :worship:
 
No good news Im afraid. I managed to completely obliterate a top today, all work goes down into the bin. Messed up when trying to fix a mistake with the rosette, and got black color bleed out from the rosette, into the surrounding area.

Well. At least I got some braces done that I hadn't glued on yet...
 
Sorry it did not work out brother. Just remember, in the words of BamBam from The Flintstones:

"Winners never lose, and quitters never win..."

and also 'If at first you don't succeed, try and try again (until you DO succeed)'

Please dont give up. You are inspiring many folks here on UU who are reading this thread.

We are all rooting for you, however long and whatever it takes. :)
 
Last edited:
and got black color bleed out from the rosette, into the surrounding area.
t...

Seal your wood by brushing a couple coats of a 1/2 lb cut of shellac before putting any glue. No bleed. Ever. Guaranteed. Shellac is your friend. Let it set about 10 minutes. Sealed. I love shellac. Oh... also can prevent the dreaded "glue wash" look on joints where finish won't stick quite right and leaves a lighter line because of squeeze out. Brush on a little shellac, glue, sand out any squeeze out and sand through the shellac to virgin wood. Finish with no line.

Of course if you are good there won't ever be any squeeze out to worry about.
 
Of course Seqouia ;)...

Shellac is quite hard to find in Sweden, it's not widely used. I've found a couple of places that sell it, but only in 10lbs buckets. Will make a stop at a painter's shop sometime soon, they might have some.

Btw, of course I'm not giving up, it's a set back, that's all. It also made me realise that some stuff is better bought from StewMac than home made, such as my rosette/sound hole cutting jig. My version is not precise enough, which was why I needed to do some filling in the gaps.

Braces, while not sounding like a big deal, are actually quite nice to be done with. With no bandsaw, I mill and cut them with the safetplaner.
 
Nah, shellac is easy to find. Try artists' stores, in Stockholm I get flakes from Kreatima or ABC Färgekonomi. Recto solvent most often from Masters on Södermalm but both previous mentioned stores sell that as well. If you can't find it drop me an email and I'll send you some flakes. In a pinch you can use T-röd to dissolve them.
 
Nah, shellac is easy to find. Try artists' stores, in Stockholm I get flakes from Kreatima or ABC Färgekonomi. Recto solvent most often from Masters on Södermalm but both previous mentioned stores sell that as well. If you can't find it drop me an email and I'll send you some flakes. In a pinch you can use T-röd to dissolve them.

Thank you Sven!
 
You know I read these emails from England and Sweden and where ever and I think: What is up with that? Is it possible that you can't even buy fricking shellac? Is it a shipping problem? Is it a currency problem? A tariff problem? I mean really. IIt brakes my heart. You can get the stuff directly from India in a matter of days. They ship it by aero-plane I believe. Quite fast. I think they take credit cards. Do you guys in Sweden and England not have credit cards? I mean... really. I don't get it. Disconnect here. Everyone should have access to shellac!
 
Hah, of course we got credit cards ;)' I think I saw a study recently that Sweden's use of cash is the lowest in the world. But we have a smaller market than the US, 10 million people to your 320 million. Less room for niche products, but fear not, we can always order from abroad.
 
Last edited:
I can find orange shellac, but will that give a too sharp tint? Or will it sand off as easily as clear shellac?
 
You should be able to get shellac in a grade of colors all the way from almost clear (light blond) to dark brown. Not sure about "orange". Be aware this could make a spruce top look "orange" which to my eye is not a good look but to each his own. I use number one clear so as to let the wood be itself. Can't go wrong with that. I'm experimenting with "amber" and different layers of clear and amber.... There will be no difference in the way the shellac sands depending on color. It is just a tint due to impurities in the shellac and how it was refined. The basic shellac is the same regardless of color.

Don't forget to experiment first on scraps!
 
Shellac that is called blonde comes in flakes that are light orange. Amber flakes are brown. To seal your spruce top, make sure your first coat is thin, as in dilluted. Coat the whole top in one go and don't let it overlap too much. Some alcohol based stains flow out better if you first go over the wood with just the pure alcohol, then the stain. I've considered testing that method for the first wash coat of shellac when I'm working on spruce. But haven't, I'm s** at testing on scrap. That doesn't stop me from telling others though, so make sure you test on scrap. Any problems call me at nollsjutreniosjuåttasexsjusexsju.
 
Thanks Sven, I think this is something inbetween blonde and amber, it's also described as gold. Like you I'm crap at testing stuff on scrap, but I'll try to in this instance. It'll take a while for the flakes to come though, about a week.

Also, internet spiders beware :D!
 
My wife gave me the whole day to build today, so I got loads done :)!

Before starting building, I wanted to try out a new tool I bought. Turns out this cuts PERFECT cuts, much better than a dremel and a jig. It will be used for the rosette channel and soundhole. For the channel I'll cut multiple passes and then use a chisel to remove the excess.
20170122_105711.jpg

I then thicknessed the sides, back and top. Careful setup is key here, and let me tell you, it still isnt easy with the hardwoods. Cedar cuts like butter though.
20170122_111053.jpg
After that I jumped straight onto bending the sides, the first wasnt super cooperative, but when it was time for the second I'd got the knack in again for it and it went easy. Into the mold with the sides, and then it's time for kerfings. I actually pre-bent these a bit for the waist, as I had them snap last time.
20170122_185223.jpg

To finish up, I'm gluedthe braces on the back, the top will have to wait till I get my shellac delivery, I want a protective layer before starting with the rosette.
20170122_190201.jpg20170122_190218.jpg
All in all, great progress today I think.
 
Top Bottom