I'm building a Stew-Mac tenor kit and made the fixture for gluing up the body as called for in the directions. Big mistake. Parts must have shifted during the rubber-band clamping process, resulting in something out of a painting by Salvador Dali. So I need to make a proper body mold for next time. Do plans for these exist? A Google search came up empty for me.
You are using an out of date browser. It may not display this or other websites correctly.
You should upgrade or use an alternative browser.
You should upgrade or use an alternative browser.
Plans for a body mold?
- Thread starter mzuch
- Start date
Moore Bettah Ukuleles
Well-known member
A body mold is simply made from the outline of the body of the ukulele you are building. Transfer the outline on to a piece of plywood. I stack, glue and screw three layers of 3/4" birch plywood together and cut it out on a bandsaw. The mold is cut in half along it's centerline and cabinet clasps hold it together. A couple of centering dowels where the two halves meet help to keep everything in line. You need a different mold for every size and style you will build. It's not uncommon for a luthier to have dozens of these molds so get into practice. I believe Blues Creek still offers molds for sale (http://www.bluescreekguitars.com/) but they may not fit the plan you are using.
Note that when using these molds, interior cauls (or other temporary bracing) are often used to keep the sides flush to the mold, to keep it from the movement you've experienced. These are commonly made from blocks of wood and small turnbuckles.
Good luck.
Note that when using these molds, interior cauls (or other temporary bracing) are often used to keep the sides flush to the mold, to keep it from the movement you've experienced. These are commonly made from blocks of wood and small turnbuckles.
Good luck.
Vic D
Well-known member
Here's a link to a good tutorial on building guitar molds.
http://www.lmii.com/CartTwo/DaveKit/dave/Buildingamold.htm
I took the plan from the stewmac kit and made copies then took a copy and carefully cut it out on the very outside edge of the line using an exacto blade. Then I used some spray adhesive to secure it to a 3/4 piece of plywood and cut it out close to the line on a bandsaw. Then I carefully sanded it right to the line basically making a template. Once the template is made the line is transeferred to another piece of plywood and cut out on the band saw staying just inside the line. Then the new piece is screwed and glued to the first piece and using a flush bit it's routed to match the original template exactly, then another. I used my trim router on the first one but it was kinda slow going... I'm about to make a concert size and I'll do that one on my router table.
My stewmac uke is kinda misshapen too. Won't happen again. I had the very same thought... Dali, melting ukuleleles. I'll keep that idea in the back of my head for now.
Last edited:
Pete Howlett
Well-known member
I'll video it today - i am working on a pineapple mold/form...
Steve vanPelt
Well-known member
I'll video it today - i am working on a pineapple mold/form...
looking forward to seeing the Pineapple Pete
Flyfish57
Well-known member
I based my molds off of Pineapple Pete's. I'm looking forward to his video as well. I like his whole system of gluing the top and back on at the same time.
Flyfish57
Well-known member
ohh I meant Pete's Pineapple mold
thistle3585
Well-known member
I cheated and used a CNC. The great thing about it is that you can scale the drawing to allow for side thickness to make inside and outside molds as well as bending molds plus routing jigs for the headstock and fretboard.. Here is the soprano setup from a sheet of plywood. I am thinking of scaling up the soprano body to a concert and tenor size. Anyone know if that will work?
Attachments

Timbuck
Well-known member
I was informed by an Expert that scaling up from a Soprano dos'nt work like that on ukes....I have CNC machines available but by the time I've made a drawing edited the code and got the setup running ..I could have made several moulds with the bandsaw and router method...But the CNC will be more accurate.
Ahnko Honu
Well-known member
I'll video it today - i am working on a pineapple mold/form...
Aaaaah, a Pete Howlett Pineapple.... :drool::iwant:

thistle3585
Well-known member
I was informed by an Expert that scaling up from a Soprano dos'nt work like that on ukes....I have CNC machines available but by the time I've made a drawing edited the code and got the setup running ..I could have made several moulds with the bandsaw and router method...But the CNC will be more accurate.
Yeah, I understand. My original molds were done by hand. I don't draw but the guy who does it for me found a .dxf soprano file online and used it. I'll probably have to cut the tenor by hand if I can't find a .dxf on it that I like.
Timbuck
Well-known member
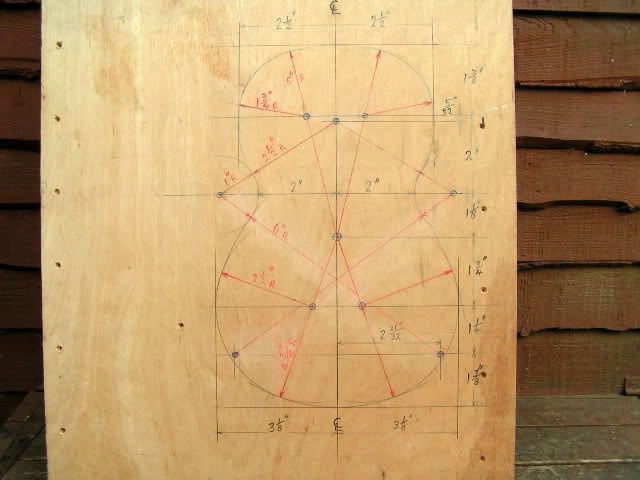
I once drew out the dimensions for a Martin type Soprano on a wooden board
All you need is a pair of dividers and a ruler and you can copy it from this photo ...Loads of intersecting arcs.
All you need is a pair of dividers and a ruler and you can copy it from this photo ...Loads of intersecting arcs.
Last edited:
Yeah, I understand. My original molds were done by hand. I don't draw but the guy who does it for me found a .dxf soprano file online and used it. I'll probably have to cut the tenor by hand if I can't find a .dxf on it that I like.
If you can scan the back (or even half) of a tenor you like, I can convert the image into DXF lines of a specific scale.
dave g
Well-known member
Here's how my use of molds is progressing...
I don't see any reason for the mold to be as thick as the sides are wide, so I've done a couple of these:

If the sides as bent don't conform to the desired perimeter shape I stick some struts in to push them out. And since I'm a "spanish heel" kinda guy there is a gap for the neck in the top, and a clamp built in to hold the neck flat and in line. To glue on the back I use a body shaped caul (on the right) with foam rubber around the perimeter. The big "c" clamp (on the left) squashes the whole shebang together while the glue sets up.
I simplified things a bit more with this latest mold:

A few strategically placed dowels serve the same purpose as the plywood cutouts. After all, the best design is the simplest one that works
I don't see any reason for the mold to be as thick as the sides are wide, so I've done a couple of these:
If the sides as bent don't conform to the desired perimeter shape I stick some struts in to push them out. And since I'm a "spanish heel" kinda guy there is a gap for the neck in the top, and a clamp built in to hold the neck flat and in line. To glue on the back I use a body shaped caul (on the right) with foam rubber around the perimeter. The big "c" clamp (on the left) squashes the whole shebang together while the glue sets up.
I simplified things a bit more with this latest mold:
A few strategically placed dowels serve the same purpose as the plywood cutouts. After all, the best design is the simplest one that works
I was trying to make the things that push out from the interior, but the smallest turnbuckle I could find made it very difficult to make a block fit the mold and be thin enough to fit in the mold in the upper bout (so there was no question it wouldn't fit at the waist, where I wanted it). My temporary fix was to put two pieces that fit the curves between the sides and just wedge them in place, but it was not very sturdy. Is there another solution to push the sides against the mold?
My mold is almost as tall as the sides, it allows enough of the sides sticking above that I can clamp the kerfing in while in the mold with the internal spreader in place. I also taper my bodys approximately a 1/4" from the back to the front, for this I made a tapered mold that sits on top of my main mold which I use as a guide for a hand plan to get consistent and symetrical results tapering the body.
-darrel
-darrel
Attachments


To glue on the back I use a body shaped caul (on the right) with foam rubber around the perimeter. The big "c" clamp (on the left) squashes the whole shebang together while the glue sets up.
Dave,
Do you taper your bodies? I've been thinking about making a similar single-clamp jig for gluing tops and backs, but am unsure if I need to account for the taper I use or not. I was thinking of using a press screw and shaped caul mounted on a pivot.
Thanks,
-darrel
Vic D
Well-known member
Camface,
I was using the same method for my Stewart Macdonald soprano kit... didn't work so hot. Scrounging around the shop this is what I came up with, just a couple of blocks of wood with the curve put in on a belt sander then a couple of holes drilled a little more than halfway through and a bolt with the head sawed off inserted into the cauls with a couple of nuts and washers. Works great. When I get the chance I'll pick up some wing nuts.
I was using the same method for my Stewart Macdonald soprano kit... didn't work so hot. Scrounging around the shop this is what I came up with, just a couple of blocks of wood with the curve put in on a belt sander then a couple of holes drilled a little more than halfway through and a bolt with the head sawed off inserted into the cauls with a couple of nuts and washers. Works great. When I get the chance I'll pick up some wing nuts.
Last edited:
In general, how thick (or deep) do you make your molds? I bought one from Blue Mountain Accoustics, and it's only 1 3/4" thick. Seems kinda thin to me, but then I have nothing to judge it on.
Vic, I'll have to try that and see how it works for me. Thanks for the suggestion.
I just doubled up some 3/4" plywood for the concert scale. I haven't made a tenor yet, but I may do three layers of the 3/4" just because the sides are a bit wider.
I just doubled up some 3/4" plywood for the concert scale. I haven't made a tenor yet, but I may do three layers of the 3/4" just because the sides are a bit wider.
Similar threads
- Replies
- 10
- Views
- 6K
- Replies
- 3
- Views
- 1K
- Replies
- 12
- Views
- 355
- Replies
- 22
- Views
- 982