Questions about refreting!

blizz79

Member
Joined
Jun 9, 2010
Messages
22
Reaction score
0
Location
Silverthorne, CO
I just bought a project uke off ebay that needs to be refretted. It currently has what looks to be brass frets that are uneven and almost flush with the fingerboard. Actually there is no fingerboard. The frets are set in the neck. My question is, what is the easiest way to remove the old fretts?

Any other advise on installing the new frets would be great too!
 
I did this on a project uke, which also had the frets set direct into the neck.

Removal: I took a pair of side cutters (hope this translates into US - picture here and rocked each fret out, working from one side then the other. Go slow, keep changing sides, only rock a small amount so as not to pull out chips of wood.

New frets (first attempt): I cleaned out the slots then tapped new fretwire in with a hammer. These really didn't go in level, and I spent a lot of time trying to level them down. I've just decided I'll need to re-do the job.

New frets (slightly more experienced): Since then I've built three ukes, and just fretted the third. This last time I've done a reasonable job. Tips as follows:

1. You will probably need to cut the slots wider than they are at present, to take narrow (usually described as mandolin/ukulele) fretwire. Slots too narrow are a real problem. Experiment on a piece of scrap hardwood and install a few frets. I've found that the slot needs to be only just narrower than the tangs on the fretwire. On my recent fretboard my saw was a fraction wider than ideal, but a drop of CA glue either end wicks into the slot and holds the fret - you can tap it a bit more after glueing if one end is high.

2. With a wide slot, pressing the frets in with pliers is more controllable than hammering them. For your job you'll need something like water pump pliers. Wrap the jaws of the pliers in PVC insulation tape to avoid marking neck or frets.

3. Cut ends off with your side cutters.

4. File ends flat to side of neck. I don't know how to do this without marking the finish. Masking tape, and go more carefully than I did?

5. Bevel over ends of frets - protect neck and fingerboard surface with masking tape. Go slow!

6. Dress ends of frets - use a small triangular file to remove the sharp edges each side of the fret cause by step 5. I'm about to cut a piece from a soft drink can to protect the neck as I do this. Butt it up to the fret, bend the edge over the neck, and then a couple of strokes of the file.

7. Polish up with fine grade sandpaper.

8. Check frets against a steel rule or other straight edge - if you can see light between the fret and the edge, frets either side are too high. Press/tap them down.

9. Use a credit card end on to rock each fret against its neighbours - if it rocks, that fret is too high. Press/tap as before.

10. If more radical levelling is needed, go to frets.com and read how to do it properly!

Finally, ignore any of the above (apart from noting the mistakes to avoid) if someone more experienced posts better techniques.
 
Hi. When I install frets on my piccolo ukes I do things slightly differently. They have no separate fretboards, so I cut the slots with a special jig that can be seen here.

Then I cut each fret to length and file the ends in a parabolic shape. Start at the last fret, in my case the 12th. If the fret gets too short during filing, I put it in the next slot. I file the tang at a 45 degree angle so it won't stick out on the side. Since the uke is pretty much done at this stage, I press the frets in very carefully with a screw clamp. A few cauls allow me to do the whole neck this way.

Lastly, a drop of CA at each end of the slot.

I aim for the fret to end a fraction of a mm from the edge of the neck. Getting those fractions to be the same on all frets takes some practice.

Sven
 
Awsome! Thanks for the pointers. Pressing the fretts in sounds alot more controlled that hammering them in. I pulled the old frets out last night. New wire is on the way.
 
Well, you're already done, but I recommend applying heat to the fret w/ a soldering iron before pulling them w/ the end nippers. Loosens any crud or glue and lessens the chip-out.
 
And do what Sven said, in preference to my suggestions. I've played Sven's ukuleles and he gets the frets absolutely right (my method gets them nearly right, which makes a big difference to playability).

Thanks for the tip Sven - will follow your method next time.
 
Thanks Chris. But you're ace at making coffee even though the kettle doesn't match the stove!

And what I wrote only applies to fretting a uke without fretboard. Making a separate fretboard is a lot easier and faster.
 
Last edited:
what I wrote only applies to fretting a uke without fretboard. Making a separate fretboard is a lot easier and faster.

I think your method would be worth trying for the new builder like me. I've just completed no. 3, which was the first where I fretted the board separately and then glued it to the neck. Even then, I spent a lot of time on the fret ends because (a) I had to make sure I didn't file into the wood and make it smaller than the neck, and then (b) once I'd glued it on it didn't match the neck precisely, so needed to be profiled to match which caused more work on the frets! I think it might be better to spend the time making the frets as you suggest, which will leave a small tolerance for adjustments.

To encourage the novice builder, your ukulele will still work OK and look pretty good if the fretboard is a mismatch for the neck by 1mm or so in places, so long as you sand until the two meet nicely. The ordinary human eye doesn't spot this and it doesn't affect playability. The luthier eye will see it immediately, but what the hell - this is YOUR baby, and it sings, so of course you love it to bits.
 
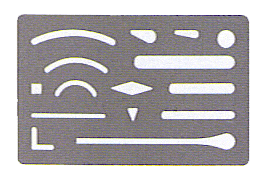
When I build with a separate fretboard, I keep it a little too wide and fret it. Then I just sand the whole thing's edges on a sanding board, sliding the fretboard across. Constantly check against the neck to stop at right width. When it's straight and the same width and taper as the neck, I just tilt it on the sanding board to take the corners off the frets. Since the fretboard sometimes is a little bowed, you have to straighten it in your hands to take the same amount off of every fret. The last filing of the fret ends I do after glueing the fretboard to the neck (don't forget the cut staples...) with a fine grade miniature file and an erasing shield as protection.
Eraserssheild.gif


All the best / Sven
 
Second the heat idea. It also causes the wood surrounding the fret to expand a bit which helps reduce the chipping. Use a big honkin' soldering gun and run it along the fret for a few seconds and then carefully pull them out. This is a great little puller instead of full size end nippers. http://www.stewmac.com/shop/Fretting_supplies/Pullers,_nippers,_sizing/Fret_Puller.html?actn=100101&xst=3&xsr=13573

Well, you're already done, but I recommend applying heat to the fret w/ a soldering iron before pulling them w/ the end nippers. Loosens any crud or glue and lessens the chip-out.
 
Top Bottom