questions about jointing two book matched board

UkeforJC

Well-known member
Joined
Jan 26, 2010
Messages
326
Reaction score
0
Location
San Diego, CA
Dear all,
I have come to ask some help from you guys again.
I received a set of book matched walnut backs from Hana Lima.
After I examined the set, I found that one piece is flat and the other is not.
The thickness at the edge is not the same as well.

They told me that it is still perfectly fine for jointing, and the board should be flat after I put the braces on.

But I am not too sure how I am going to glue these two plates with one plate curved.
Could you please give me some advice how I should process these plates before I glue them up?

PS, I don't have any power tool, but I do have quite a lot of hand tools.

Thank you..
 

Attachments

  • P1130848.jpg
    P1130848.jpg
    75.6 KB · Views: 61
  • P1130862.jpg
    P1130862.jpg
    67.7 KB · Views: 55
Doesn't look like any trouble at all.

I'm presuming that you can shoot the mating edges for a light tight joint?

One of the easiest ways to join book matched plates is with the tape / tent method. Pick the side that you want to be your show side (the outside) and lay the two pieces with that face up. Now take a couple small pieces of masking tape and tack them together. One at the top and the other at the bottom. This will register the two pieces and keep them from slipping about.

Then find something to prop one 1/2 of the plate up so it's a like a book that is almost open but not quite. Stretch tape from one half to the other in several places so that when you pull out the prop and push the plates flat the tape will have increased tension and pull the two pieces together firmly. You then fold the two pieces so the tape is on the inside. Apply glue and then lay the plates back down, but this time the show side is down. You might take this opportunity to wipe up any excess glue that squeezes out. Then stretch more tape from side to side so you are increasing the clamping pressure and when done can pick up the "clamped plates, clean excess glue off of the other side then lean up against something so air can get to both sides if you like. Or lay flat again and put something heavy on top. Choice is yours.

There is a few pictures on my web site at the beginning of a build thread for a tenor uke that might make what I just described a bit clearer.
 
After you glue the joint, just scrape the joint until it's even. I had the same HanaLima walnut and it had uneven sides too. Getting the joint to be tight all the way through the joint was the hardest part for me.

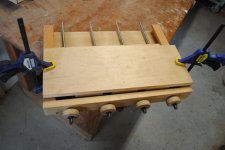
I glued it using a low tech wedge method. I clamped two straight edges so that the when the joined boards were between them there would be a lot of pressure squeezing them, enough where you had to press the boards down to keep them from popping up a little. Put two small wedges at the two ends of the joint. Glue the joint then remove the wedges, push the boards down to make a tight joint, then put a bunch of weight on top to keep the pressure on the joint. I'd copy the pros before me though.
 
Last edited:
Blimey that LMI jig looks a bit OTT!

Three people and that bloody great contraption to do what the flamenco bloke does with a couple of sticks....
 
I use five (almost) perfectly true 1" square sticks and lots of large rubber bands instead of string.

Henrik Jansson's web page is very good for traditional Torres guitar building with hand tools:
"Joining Top and Back,Gluing and Thinning"

Before you join the two pieces, they should be a perfect fit with no gaps when you hold them up to a light.
 
This is a jig that I use, but when things get backed up I also use the rope and wedges technique with equally good results.
 

Attachments

  • DSC_0030.jpg
    DSC_0030.jpg
    43.1 KB · Views: 37
  • DSC_0028.jpg
    DSC_0028.jpg
    40.5 KB · Views: 31
  • DSC_0026.jpg
    DSC_0026.jpg
    46.1 KB · Views: 35
  • DSC_0027.jpg
    DSC_0027.jpg
    40.9 KB · Views: 33
thank you guys for all the inputs for how you did the jointing.

I think I am more concerned about my two plates being not even. In my OP, the picture showed that one board is flat and the other is not flat.
I was wondering whether this will create any potential problem.

Right now I stacked a few heavy textbooks on top of that board, hopefully it will be flat after that....

thank you all.
 
After your plates are glued together you're going to run them through the sander which will bring anything to the same thickness. You've got enough meat there. Any slight cupping will be eliminated when you brace. But please, make sure you glue up and brace in a moderately dry environment. Before you do anything, make sure the boards are stored for a while in the environment in which the uke will be built. It's the wild swings in humidity that causes most problems.
 
thank you guys for all the inputs for how you did the jointing.

I think I am more concerned about my two plates being not even. In my OP, the picture showed that one board is flat and the other is not flat.
I was wondering whether this will create any potential problem.

Right now I stacked a few heavy textbooks on top of that board, hopefully it will be flat after that....

thank you all.

in that case... glue them up carefully. Decide which faces are going to be the outside and make sure that they are flush. You can manipulate the joint under low clamping pressure...when you have both faces lined up, tighten your clamps. Any cupping or irregularities in thickness will come out when you take the glued up panel to it's final dimension.
 
ive had this problem a couple of times, i just made sure the weight went on from above (forcing the boards flat) slightly before i did up the clamps that pushed the boards together, both of mine came out perfect... :)
 
Top Bottom