question about the drying form...man, bending is quite fun.

UkeforJC

Well-known member
Joined
Jan 26, 2010
Messages
326
Reaction score
0
Location
San Diego, CA
Dear all,
I finally decided to make my bending iron, instead of buying one, and start practicing bending. Thanks to many of you, I was able to get all the information to make the bending iron.
So, for my first time bending, I cut a piece of wood bought from HD, prorbably pine.
I planed it down to 2 mm and start bending. I went super slow, and I was able to do it. And no crack, or burn..
Maybe beginner's luck? Man !! that was fun.
Learning to bend the side is really making me feel that I am really learning to be a ukulele maker. haha..

P1140364.jpgP1140377.jpgP1140391.jpg

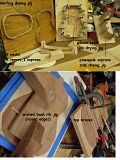
So, I am having a problem with my drying form.
Since I couldn't really make a mold, I made a drying form just like what Dave G has shown in his video.
I found the sticks that I glued on to the ply wood are not perfectly straight. I meant they are not perfectly perpendicular to the plywood.
Because of this, I noticed that some sticks are not exactly in contact to the bended side.
I am afraid that the side might not be straight as well. Then the sides might not be perpendicular to the top and back.
Is it really going to be a problem?
Is there anyway to improve the drying form? or I just have to bend the side more carefully?

Thanks
 
Nice pipe set up. I'd say the easiest thing to do would be to just add shims between the posts and the side to make it straight. Just jam somthing in there...scraps of wood, folded paper, cardboard, whatever. I hope the glue on the dowels is strong enough to hold up.
You definitely want the sides to be square to the top and back. A little bit off is ok, if the side is cupped or rippled after drying..... if you can sand it square when you have the body glued.
 
Here is a little trick to make your drying jig better. Instead of using 1/2" diameter dowels, go up to 1" ones, cut them square about three inches long. Instead of gluing them to the plywood, use wood screws through the plywood to attach them. Instead of drilling the pilot hole in the dowels in the center, offset the hole about 1/8". This way when everything is assembled, you can adjust the position of your sides by turning the dowels, which move in a camming action to bring things into perfect alignment.

Brad
 
Thanks ksquine,
Actually, I got the idea of sticking the heat gun into the pipe from your bending iron picture. I even got the same heat gun. haha...
 
Thank you Brad for the idea. That is pretty cleaver.

Just one question, do you also drill the pilot holes on the plywood about 1/8" away from the uke body outline?

I also assume that the pilot holes has to be perfectly straight, right? man... I really need a drill press.
 
If you are using 1" dowels the pilot hole in the plywood base are 1/2" from the body outline. That way if the dowel is drilled 1/8" off center, you should be able to turn the dowel to go as much as 1/8" inside or outside the outline. And yes, the holes should be drilled straight and the ends of the dowel cut square,

Brad
 
I use pieces of aluminum dowel for my jigs..spaced about .080 apart..I can "squeeze clamp" the tops to keep the sides at the right "level plane" when the body sides taper.
I laid out the drilling center points by using the outside line and a piece of wood the right thickness to reach the center of the tubing.On the inside,used added a piece of the body side to get the right distance.
The aluminum conduit or tubing pieces are removable so I can use them for other pattern jigs.the tenor I made single layer and the pineapple soprano one has a couple extra holes drilled for a standard shape..sides are stacked two high in that one with 6" pieces of aluminum tube,single layer about 4" long.Maximum side height at 3" or so.The aluminum doesn't shrink,swell,or need to be connected to the plywood..seems to work okay.
I plan on making other shape/size drying forms without more costs for the aluminum tubing..the reason for the removable/reusable pegs....

wow, the jig is nice.
however, cutting the aluminum tube will be a challenging task for me... hahaha...

thanks for sharing.
 
Here is a little trick to make your drying jig better. Instead of using 1/2" diameter dowels, go up to 1" ones, cut them square about three inches long. Instead of gluing them to the plywood, use wood screws through the plywood to attach them. Instead of drilling the pilot hole in the dowels in the center, offset the hole about 1/8". This way when everything is assembled, you can adjust the position of your sides by turning the dowels, which move in a camming action to bring things into perfect alignment.

Brad

That's friggin' brilliant! Thanks for sharing that idea. :D
 
Top Bottom