joejeweler
Well-known member
- Joined
- Jul 7, 2011
- Messages
- 538
- Reaction score
- 0
"Hole'y Joe" Is At It Again,......Sorry Ken, The Bridgeplate Is GONE
I didn't want to keep jumping in on Ken Timms thread regarding some side bending problems on a recent wood batch, so i thought i would start a new thread on some further changes i made to this soprano.
Quotes from here: http://www.ukuleleunderground.com/forum/showthread.php?52027-10-ukes-forward..6-ukes-back
Don't worry, i didn't pop any new holes in this time,...just sort of worked with (or thru) the original a bit. But i seemed to have gotten Ken's permission to do what i wanted with it in the last quote above, ...so i did!
Just after i recieved Timbucks uke from another member, i came across this thread where the subject of some soprono ukes having no top bracing came up.
http://www.ukuleleunderground.com/f...an-unbraced-soprano&highlight=bracing+soprano
That got me convinced i wanted to make a few adjustments on this formally "Style O" soprano. My initial soundport was not the initial change that dropped it from that catagory, as the "eared" geared tuners arrived to me in that condition.
As Ken pointed out, a soundport (especially in the lower bout) does lower the bass notes (on the "C" string mostly), although as i pointed out the "E" string is actually boosted a similiar amount. I will admit the overall balance is better without the port open.
However, what i didn't want to mention right away was the main reason i cut the soundport into this soprano, which was to adjust the bracing to get the sound i was after. (If it didn't work out, you'd never be reading this! )
I read that Ken Timms (timbuck here) does NOT accept commissions, and has specialized in making mostly Martin "Style O" Sopranos, and a few Tenor ukes also. So getting Tim to make me a somewhat custom braced uke was not going to happen. (easily)
I wasn't able to find out exactly how Martin braced the tops on their vintage Style O Sopranos, but i'm assuming Tim looked at an example or two to base his version on. I am not locked into whatever bracing pattern Martin used, which may have even changed over the years they produced this model.
Put as delicately as i dare,....the tone on the uke when it arrived just didn't appeal to me. Not sure how to describe it, but it sounded a bit muffled, with notes sounding thin and a bit dead the further up the neck i went. A string change back to Aquila's helped, as well as a bit higher saddle i made. (i think the PO lowered the original saddle a little as he likes low action).
I have the benefit of owning two of Chuck Moore's sopranos, and because he is not locked into reproducing a certain vintage "style", is more open to making whatever changes are needed for a richer, fuller sounding soprano ukulele. The tone on both of Chuck's soprano's IS what appeals to me, and i was determined to do what i could to get my only "hog" uke as close as i could.
After carefully using a small mirror inside to compare them all,....i decided to remove the fairly wide bridgeplate on the Style O reproduction. It was immediately apparent a chisel would not work, you just couldn't control the angles, and it worked too fast to work in a vision restricted area and be safe.
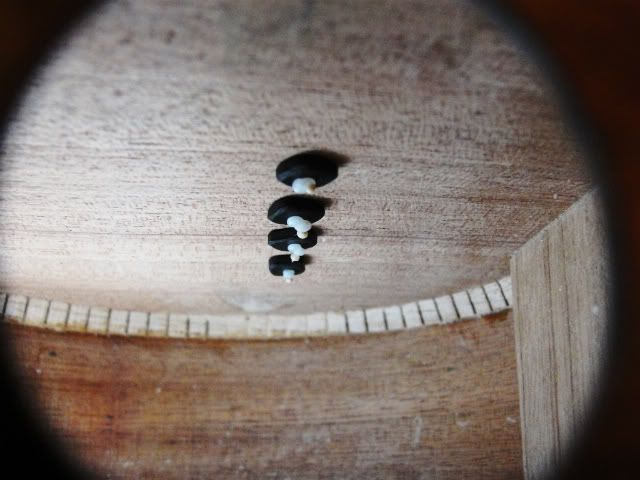
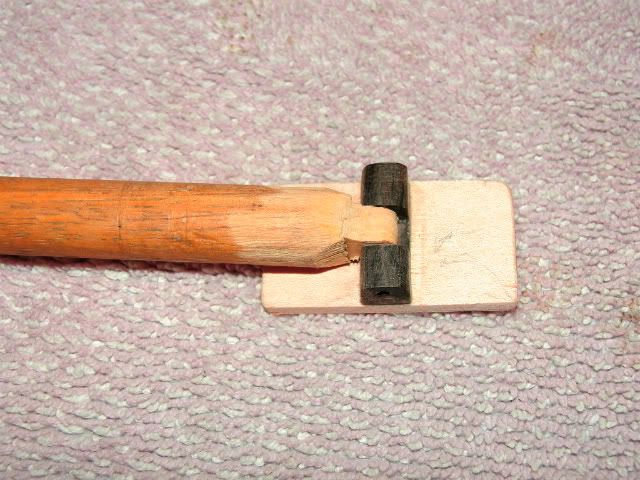
I decided to make a small sanding block, mounted to a simple piece of 1/2" maple dowel stock i had laying around. The sanding block base was off a piece of maple bridgeplate material i picked up from stew-mac, and the swivel part from a leftover piece of rosewood bridge stock. I didn't spend a lot of time on it, as it just needed to be functionable and not pretty. After supergluing the drilled out rosewood piece to the maple base, and using stick on 120 grit sandpaper to the bottom, i had my "tool" ready in about 45 minutes.
After about an hour, i had the entire bridgeplate sanded off, with just a touch of glue still showing at that far side i didn't worry about. I left that there as a indicator of what had been there previously. I was able to put pressure on the handle, upward against the top, by pressing the handle against my other hand. (it kept the handle from rubbing against the soundport walls)
With a small flashlight stuck thru the soundhole, i could see my progress surprisingly well working thru the soundport. I tried to work the sanding evenly, and as it got down to the glue i slowed down even more. As one area cleared off to the base of the mahogany top, i avoided that area and concentrated on the next until all remnants of the bridgeplate were removed save for that small glue spec noted above.
I also worked the two soundhole braces down to about 1/2 their original height, working thru the hole with a small piece of the same 120 grit stick on sandpaper stuck to my finger. I marked the outside of each brace with a small pencil mark at approximately 1/2 the height, to use as a guide to know when to stop. I might have been able to remove these soundhole braces completely, but decided to wait and see how it sounded the way it was.
I restrung it with a new set of Aquilla nylguts, and carefully brought it up to tension while i kept a careful eye on any signs of the top coming up or distorting. I had layed a thin straightedge in front of the bridge and used it to check for any changes to the top's shape, and none were noted.
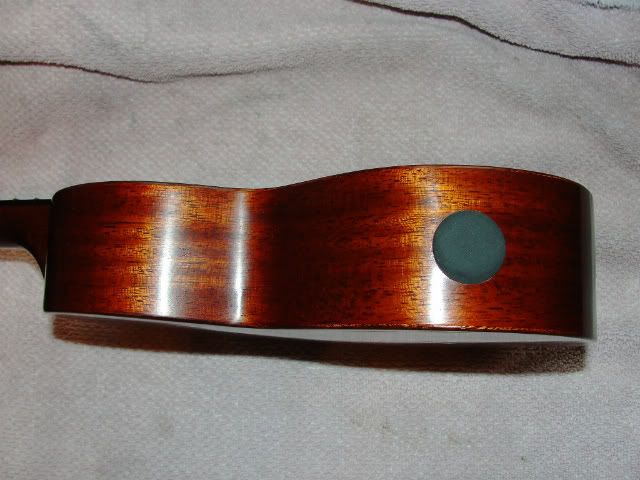
The last thing i did was make a temporary black rubber plug for the soundport, until i come up with a more fitting permanent one.
After it settled in and the strings were stretched out, i have to say it was worth ALL the effort i put in. The tone is now full and sweet, and no dead spots on notes at the far end of the fretboard. The volumn has also increased dramatically, and i'm having a ball with it now! I'm putting a hook on the wall becide a bookcase, where it will hang in easy reach whenever i'm in the mood to play.
......Ken mentioned that Mrs Timbuck wasn't impressed with the soundport change, but i would be willing to bet the bracing change would put a smile on her face, soundport plugged or non-existant, of course!
One other reason i posted this now, is to encourage Ken to run a few off at all his usual specs, except leave off the bridgeplate and reduce the soundhole braces to half the height. No soundport necessary!
......one he can keep for himself, and i'll be ready to snap up the other unless Mrs Timbuck gets to it first! :biglaugh:
(that's a legit commitment Tim!)
Here are some pics:
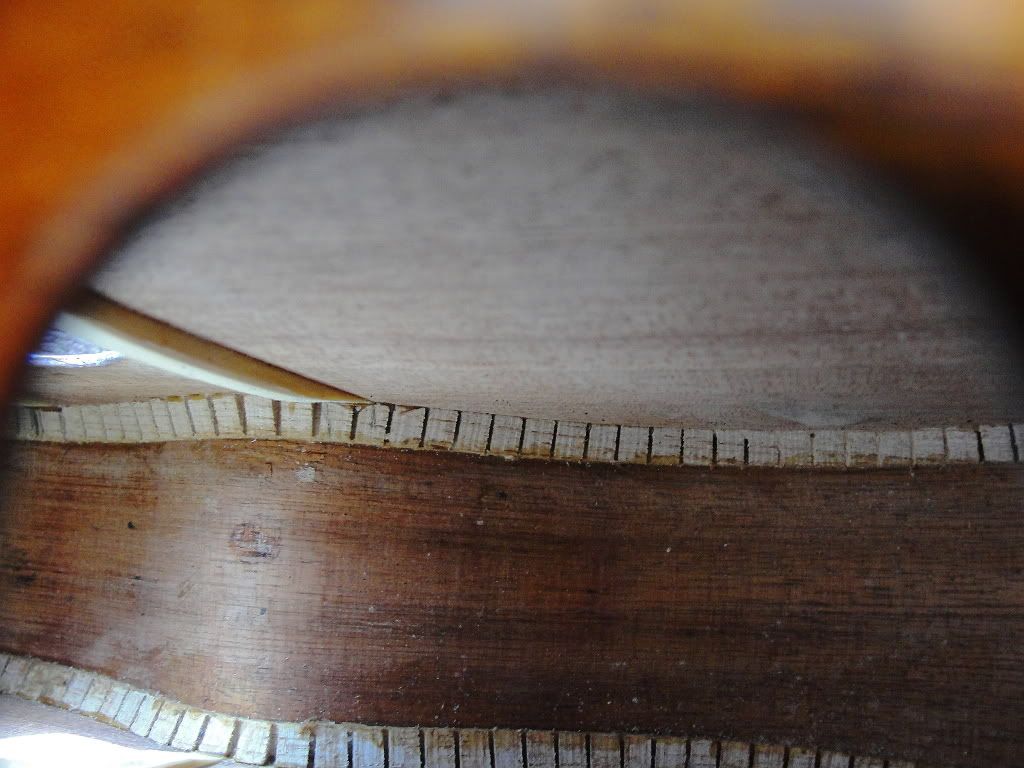
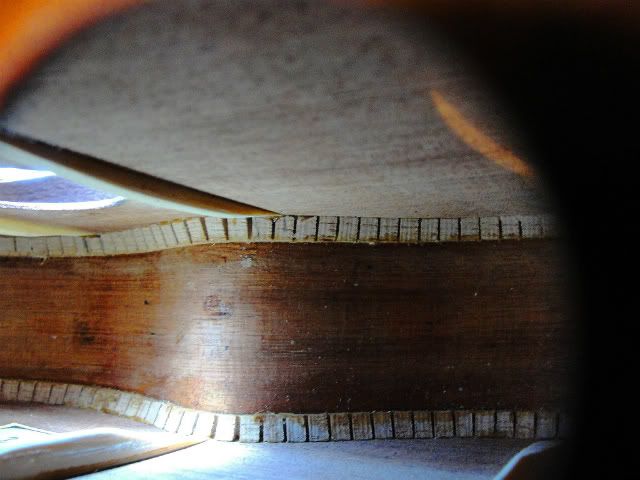
To the upper right you can see the glue remnant to the removed bridgeplate, a "memorial" of sorts
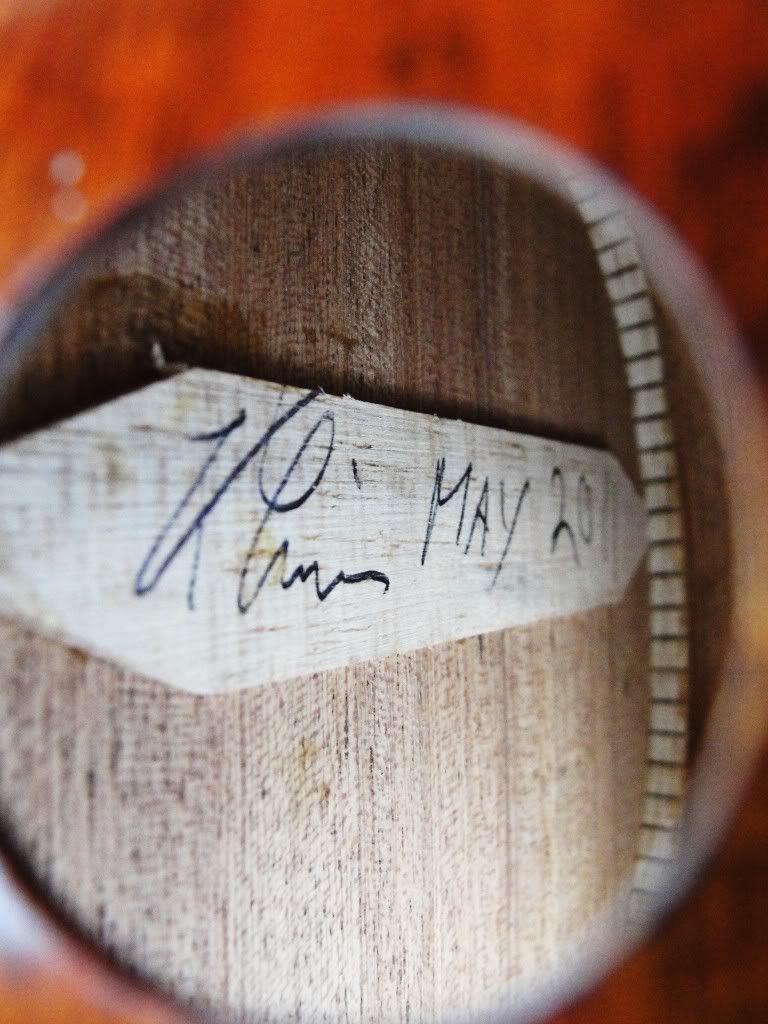
This is the bridgeplate in place, before it was sanded out in full. (hated to lose Ken's signature and dating)
This is a temporary rubber plug i used, until i get a lightweight cork one fitted capped with a matching piece of mahogany or contrasting ebony???
I didn't want to keep jumping in on Ken Timms thread regarding some side bending problems on a recent wood batch, so i thought i would start a new thread on some further changes i made to this soprano.
Quotes from here: http://www.ukuleleunderground.com/forum/showthread.php?52027-10-ukes-forward..6-ukes-back
From now on! he will be known to me as "Hole'y Joe"
Chuck !...it was just one board that produced the cracked sides..All the good ones came from another.
farner!...It's a strange tale about that Style "O" type Soprano...I don't normally number my ukes, but that one was "special" being the 160th uke that I've built in the 4 years since I started so it got a number stamped on the headstock..I auctioned on E-bay like I normaly do ..and it went to a Guy in the US..the first thing he did was change the strings (fair enough we all do that) Then he decided he didn't like the friction tuners..and swapped them for geared ones (like sticking ears on it, as they say on Cosmos)...now it was starting to look less like a Style "O" and more like a style "X"...now it's had a hole cut in the lower bout to reduce the bass end tone I presume..co's that is what it will do..and the Guy sent me PM's telling me about all the mod's.. ? should I be impressed?? (Mrs Timbuck ain't)...I would like to know if the value of this uke has now gone up or down...I'm expecting a pick up unit to be fitted to it next ..(along with strap buttons who cares...it's his uke he can do what he wants with it.
Don't worry, i didn't pop any new holes in this time,...just sort of worked with (or thru) the original a bit. But i seemed to have gotten Ken's permission to do what i wanted with it in the last quote above, ...so i did!
Just after i recieved Timbucks uke from another member, i came across this thread where the subject of some soprono ukes having no top bracing came up.
http://www.ukuleleunderground.com/f...an-unbraced-soprano&highlight=bracing+soprano
That got me convinced i wanted to make a few adjustments on this formally "Style O" soprano. My initial soundport was not the initial change that dropped it from that catagory, as the "eared" geared tuners arrived to me in that condition.
As Ken pointed out, a soundport (especially in the lower bout) does lower the bass notes (on the "C" string mostly), although as i pointed out the "E" string is actually boosted a similiar amount. I will admit the overall balance is better without the port open.
However, what i didn't want to mention right away was the main reason i cut the soundport into this soprano, which was to adjust the bracing to get the sound i was after. (If it didn't work out, you'd never be reading this! )
I read that Ken Timms (timbuck here) does NOT accept commissions, and has specialized in making mostly Martin "Style O" Sopranos, and a few Tenor ukes also. So getting Tim to make me a somewhat custom braced uke was not going to happen. (easily)
I wasn't able to find out exactly how Martin braced the tops on their vintage Style O Sopranos, but i'm assuming Tim looked at an example or two to base his version on. I am not locked into whatever bracing pattern Martin used, which may have even changed over the years they produced this model.
Put as delicately as i dare,....the tone on the uke when it arrived just didn't appeal to me. Not sure how to describe it, but it sounded a bit muffled, with notes sounding thin and a bit dead the further up the neck i went. A string change back to Aquila's helped, as well as a bit higher saddle i made. (i think the PO lowered the original saddle a little as he likes low action).
I have the benefit of owning two of Chuck Moore's sopranos, and because he is not locked into reproducing a certain vintage "style", is more open to making whatever changes are needed for a richer, fuller sounding soprano ukulele. The tone on both of Chuck's soprano's IS what appeals to me, and i was determined to do what i could to get my only "hog" uke as close as i could.
After carefully using a small mirror inside to compare them all,....i decided to remove the fairly wide bridgeplate on the Style O reproduction. It was immediately apparent a chisel would not work, you just couldn't control the angles, and it worked too fast to work in a vision restricted area and be safe.
I decided to make a small sanding block, mounted to a simple piece of 1/2" maple dowel stock i had laying around. The sanding block base was off a piece of maple bridgeplate material i picked up from stew-mac, and the swivel part from a leftover piece of rosewood bridge stock. I didn't spend a lot of time on it, as it just needed to be functionable and not pretty. After supergluing the drilled out rosewood piece to the maple base, and using stick on 120 grit sandpaper to the bottom, i had my "tool" ready in about 45 minutes.
After about an hour, i had the entire bridgeplate sanded off, with just a touch of glue still showing at that far side i didn't worry about. I left that there as a indicator of what had been there previously. I was able to put pressure on the handle, upward against the top, by pressing the handle against my other hand. (it kept the handle from rubbing against the soundport walls)
With a small flashlight stuck thru the soundhole, i could see my progress surprisingly well working thru the soundport. I tried to work the sanding evenly, and as it got down to the glue i slowed down even more. As one area cleared off to the base of the mahogany top, i avoided that area and concentrated on the next until all remnants of the bridgeplate were removed save for that small glue spec noted above.
I also worked the two soundhole braces down to about 1/2 their original height, working thru the hole with a small piece of the same 120 grit stick on sandpaper stuck to my finger. I marked the outside of each brace with a small pencil mark at approximately 1/2 the height, to use as a guide to know when to stop. I might have been able to remove these soundhole braces completely, but decided to wait and see how it sounded the way it was.
I restrung it with a new set of Aquilla nylguts, and carefully brought it up to tension while i kept a careful eye on any signs of the top coming up or distorting. I had layed a thin straightedge in front of the bridge and used it to check for any changes to the top's shape, and none were noted.
The last thing i did was make a temporary black rubber plug for the soundport, until i come up with a more fitting permanent one.
After it settled in and the strings were stretched out, i have to say it was worth ALL the effort i put in. The tone is now full and sweet, and no dead spots on notes at the far end of the fretboard. The volumn has also increased dramatically, and i'm having a ball with it now! I'm putting a hook on the wall becide a bookcase, where it will hang in easy reach whenever i'm in the mood to play.
......Ken mentioned that Mrs Timbuck wasn't impressed with the soundport change, but i would be willing to bet the bracing change would put a smile on her face, soundport plugged or non-existant, of course!
One other reason i posted this now, is to encourage Ken to run a few off at all his usual specs, except leave off the bridgeplate and reduce the soundhole braces to half the height. No soundport necessary!
......one he can keep for himself, and i'll be ready to snap up the other unless Mrs Timbuck gets to it first! :biglaugh:
(that's a legit commitment Tim!)
Here are some pics:
To the upper right you can see the glue remnant to the removed bridgeplate, a "memorial" of sorts
This is the bridgeplate in place, before it was sanded out in full. (hated to lose Ken's signature and dating)
This is a temporary rubber plug i used, until i get a lightweight cork one fitted capped with a matching piece of mahogany or contrasting ebony???
Last edited:
 ..(it's funny how you go off some people) and my name is KEN (the good thing is my name has been removed..Thanks)