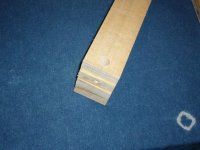
#4 ULO journal

UkeforJC

Well-known member
Joined
Jan 26, 2010
Messages
326
Reaction score
0
Location
San Diego, CA
Dear all, after about four months, I finally almost finish my #4.
I hope you won't mind reading my long post again.:eek:
I would love to hear everyone's advice and feedback and learn from all of you. So, if you see something that I did is wrong, please let me know.

This ukulele is a concert uke. I follow the Hana lima plan.
Top: bear claw sitka spruce
Back/sides: zebrawood
fretboard and bridge: East Indian rosewood.
Neck: sitka spruce

I mainly used hand tools, since I am only making the uke on my dinning table in my small apartment.

P1150248.jpg
This is the zebrawood back and sides that I got.

P1150253.jpg
I used a simple shooting board and a low angle jack plane to shoot the edge for joining the back.

P1150257.jpg
I used the tape methods to join the back plates. Quite simple...and I haven't run into any trouble yet.

P1150275.jpg
The back is joined and the other board is the bear claw spruce.

P1150487.jpg
Planing down the spruce down to about 2 mm.
 
P1150492.jpg
thicknessing the back with a plane.

P1150498.jpg
that is a lot of shaving....and this only one third of all the shaving...

P1150546.jpg
sawing the sitka spruce for bracing.

P1150701.jpg
I used an old fashing way to cut the sound hole. I learned this from this forum as well.

P1150707.jpg
This is the very first round sound hole I have ever cut.
Not too bad...
 
P1150572.jpg
plane down the side to around 2 mm.

P1150578.jpg
setting up all the equipment for bending.
I used a very simple bending iron heated with heat gun.

P1150585.jpg
Sides were bent and clamped to the mold. I let them sit for a day.

P1150688.jpg
gluing neck and tail blocks to the sides.

* there was a thread discussing working with zebrawood before.
I agree with most people's comments.
Zebrawood is not the easiest wood to work with. (well, not that I have that much experience any way.) I did have some hard time thicknessing zebrawood with hand plane. Zebrawood is very dense and hard. I had to stop in the middle and hone the plane blade.

When I bent the sides, I did have a few cracks. Luckily the cracks were not very bad and not very big. I could fix them by applying CA and them clamp it.
For now, I don't think the crack will affect the structure integrity, but it is definitely going to be visible after I apply the finish.:(

Oh well....the goal is to finish the uke and learn from the mistake.

I will post more tomorrow...time to go to bed.
 
Thank you all for the kind words...
I really love building ukulele, and I just wish that I can have more time after my job...

P1150726.jpgP1150734.jpg
I always like solid lining better, so I bent four strips of spruce lining and glued to the sides. The linings were around 2.5 mm. Maybe they were a bit too thick. I also trimmed the excess sides with a chisel.
P1150714.jpg
All the braces and tone bars were cut from a spruce bar.

P1150718.jpg
Gluing the braces to the top

P1150747.jpg
the bridge plate is glued, braces were roughly shaped..
 
P1150911.jpgP1150916.jpg
back is also prepared. I glued in the spruce braces and center reinforcement strips.

P1150755.jpg
Gluing tone bars to the top. I skipped the center tone bar for this build.
The Hana Lima plan calls for three tone bars, but after I read a lot from this forum, I decided to try just two.

P1150762.jpgP1150756.jpg
Tone bars were shaped as well and sides were prep ready for gluing to the top.
 
Very nice pictures and work. Thanks for sharing your build.

BTW I assume by the bridge patch location you will have 14 frets above the body?
 
Great pictures and documentation, and on the dining room table. Its looking good, keep up the pictures and the great work. Did you build your mold from the plans?
 
@ Doc_J, thanks and ya, I will have 14 frets above the body.

@ RonnieD, I didn't build my mold. I paid someone to make the mold for me. If I have a band saw and a router/router table, or a spindle sander, or belt sander...or any power tool, I would make it myself.
Maybe in the future....:)
 
Glad to see someone else using the tape method for joining tops and backs!

We use the brown "flat back" tape often sold for doing binding. One strip as a hinge along the joint, three or four cross panel strips wrapped around the edges of the pieces, a bead of hot hide glue, and we can do dozens if need be without needing clamps or fixtures. Also great for joining irregularly shaped pieces as we often do. I can lay out my half patterns to get maximum yield of the wood I resaw and don't need those parallel edges that most folks need to be able to use "normal" clamping methods.
 
Ya, the tape method is really simple and does not require any jig that might take any space in my apartment. I love it. But I should use a better tape though....

P1150261.jpgP1150272.jpg
I use scarf joint for my neck.

P1150783.jpg
Gluing the top to the sides. Everything is centered.
By the way, I will use bolt on neck for this build (also the first try). I forgot that I need to drill the hole on the neck block before I glue it to the side. Since I can't fit a power drill in, I had to hand carve the hole.
As you can see, the hole on the neck block in side the body is quite rough. Next time, I will remember to drill the hole first.

P1150795.jpg
Top is trimmed.

P1150778.jpg
I the brad point drill bit to make a mark on the neck. That is the spot that I will drill. I learned this trick from Master Pete Howlett's youtube video.:)
 
P1150785.jpg
I drilled two holes on the neck for the bolt on methods. I didn't have the right size drill bit for the top hole, so I made a oversize hole for the nut (bolt?)

P1150895.jpg
then endless carving.....This process is still quite challenging for me. But seeing Sven (Argapa ukuleles) hand carved a couple more very nicely done necks encouraged me again....
It took me three weekends to go this far...hahaha..:eek:

P1150897.jpg
Koa head stock veneer glued..

P1150898.jpg
I like the brown white brown white layers....
On the neck heel, the glue lines are visible. This tells me that the mating surfaces were not perfectly prepared.
I don't know...I tried my best to sand it flat. The grain of those blocks matched nicely, but too bad the glue lines are so obvious.
Anyone has any suggestion on how to improve this?

P1150900.jpg
Tuner holes were drilled.
 
Last edited:
Beautiful work. The bearclaw is real nice. If you're planing the blocks of the heal cap, you might try sanding with 100 grit before gluing them up. And make sure you have decent clamping pressure. The lines will still be sharp but will blend and look less like a glue joint. Although most heals I've seen that aren't one piece show the glue joint, pretty few match up the grain perfectly.
 
Last edited:
I am enjoying this post, as a wanna be builder I am learning from your progress. I would like to know what kind of hand plane your using for the top and bottom? I need to plane my bottom and top set down quite a bit, but have no planner or thickness sander myself. I also can not figure out the tape method? Why are they braced up on the wood in cclancy picture? I appreciate your work on documenting the build.
 
@ Vic, thanks a lot for the suggestion. I did sand the blocks with 100 grit sand paper. When I saw the glue lines, I was disappointed, since I thought I carefully prepared the mating surface.
but any way...
I looked at many guitars from other forum, and ya, most heals I have seen that aren't one piece show the glue joint as well.

...I would like to know what kind of hand plane your using for the top and bottom? I need to plane my bottom and top set down quite a bit, but have no planner or thickness sander myself. I also can not figure out the tape method? Why are they braced up on the wood in cclancy picture? I appreciate your work on documenting the build.

The plane I got is a a Lie-nielsen low angle jack plane.
http://www.lie-nielsen.com/catalog.php?sku=62
It is very expensive, but worthy to me. I have enjoyed it anytime I use it.

As for the tape method, I have learned it from Master Allen of Barron River Guitars. Here is an old thread discussing different joining methods. Allen mentioned how he does the tape method.
http://www.ukuleleunderground.com/f...estions-about-jointing-two-book-matched-board
 
P1150907.jpg
I decided to glue the neck on first before the back, so I can see what is going on. I did add a drop of titebond to the bottom of the bolt, so it does not move.

P1150919.jpg
I trimmed the heal flush to the sides and neck block. The heal is a little bit too big to my taste, so I will carve it smaller.
I also thinned the bridge plate at the edge of the two wings.

P1150923.jpgP1150925.jpg
Back is being glued on to the body.

P1150937.jpg
Excess is trimmed.
 
Moving on to finger board.

P1150811.jpg
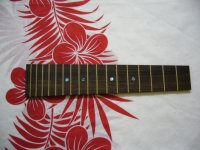
I used Indian rosewood fretboard. I bought this from LMI. They did a nice job slotting it for me. I drilled the holes for fret marker. I love the 5mm brad point drill bit I got from LMI, but I think Lee-Valley carries the same thing as well.
Paua Abalone for fret markers.

P1150820.jpg
I use a small shooting board and block plane to taper the finger board.

P1150962.jpg
Fret wire installed. I had to go to a park near by my apartment to do the hammering, for it was too noisy to do it at home. But it was perfect. I got to enjoy the outdoor fresh air, children playing around....
I did see some parents looked at me funny though...oh well.

P1150973.jpg
Fingerboard is glued on to the neck. Time to start endless sanding...my least favorite part of precess.
 
Top Bottom