Help me getting frets seated on my StewMac tenor kit!!!

JamieFromOntario

Well-known member
Joined
May 11, 2010
Messages
557
Reaction score
0
Location
Here and there
Until today, I've been having a great time making my StewMac tenor.

I've completed the body and am trying to seat the frets before gluing the fret board to the neck.

The kit comes with three lengths of fret wire. I have gone through one of them and only have two frets seated.

I seat the fret wire at either edge of the fretboard first and then tap it down lightly in the middle (I'm using a fret hammer).
Problem is the fret wire keeps popping up on one side as I tap down the other. Then when I'm going back to reseat what's popped up, the wire gets bent up and away from the fretboard and it's then impossible (at least for me) to reseat.
I'm wrecking the fretboard as I am forced to pull the fret wire out again and again.

Suggestions?

Plus, anyone know what size fret wire is used in these kits? Looks like I'm going to have to order some more before I can complete it (which is a bummer since shipping is about $30).
 
For all things fretting, my go to is frets.com. Frank has a great tutorial called when frets go wrong, or something similar.

A few things I do that help...
Put a slight radius in the wire
Use the plastic side of the hammer
Chamfer the slot
Squeeze a little HHG in the slot
30 or 40 light taps with the hammer instead of 3 or 4 big whacks
Practice practice practice

I talked to Frank about fretting when I was at his shop last year and he told me that it only takes about a hundred fret jobs to make all the general fretting mistakes. After that it gets easier. I still have a few to go.

Good luck, Steve
 
The center of the fret should be the very last place you tap, and the harder you hit the frets, the more they'll fight you.

Curve the fretwire to an arc of about 12" in radius. Tap in at each end, tap alternately bass side and treble side moving the taps in toward the center. Twelve taps should do it. There's a real art to this and it takes a sure, even, and firm but gentle touch. This is not framing a house with 16d nails and a 22 oz framing hammer...
 
Here's what works for me....
1 clean out the fret slots. A utility knife with a hook blade works well or a razor
2. put a bend in the fret wire. I bend the whole strip by hand to ~24" radius
3. cut a piece to length
4. apply a thin thin bead of wood glue to the fret tang
5. tap one side into the slot. I use a regular hammer with a block of scrap wood to protect the fret
6. tap along the fret to the other side. one side of the fingerboard to the other
7. Wipe any glue off with a damp rag and check the fit

Also, be sure you have good support under it. I fret my fingerboards before attaching to the neck. If you're fretting with the fingerboard on the neck....a bag of flour makes a good support under the neck
 
Thanks for the insights. I really appreciate advice from the pros.

Everything else with the kit has gone so swimmingly that I was surprised by how difficult putting these fret in is. Gord Mayer in the StewMac DVD seems to do it in about 10 seconds...I guess that's where the practice comes in.
I wish I had a few dozen fret boards to practice on.

I think i'll put on some peaceful music and head back to the workshop to try again in a little while.

Now, if I do screw up (which I assume I will) as I try to put the new few in and get one of those up bends at the edge, is there any way to fix that? or should I just pry the fret wire out and give it a try with a fresh piece?
 
I recently built one of the Stewmac Tenor Kits and I worried about the frets as well, but installation went surprisingly easy. The last time I installed frets was years ago on a dulcimer. This time on the Stewmac I used my drill press as a fret arbor. I put an allen wrench into the chuck, using its flat side to press the frets into the slots. It worked very well.
 
I sometimes set the fret into the slot at the ends, and then press it in with my Zyliss vise. It works for me but without training it would be very easy, extremely easy really, to cock it up big time.

When I fret my piccolos I do so after the neck is attached. The slots are also cut after attaching the neck (long story). Then I use a clamp to set them, I made a video of it:

http://www.youtube.com/watch?v=RthpRCyEAnM

My son held the phone that was used to record it, hence the crude camera work.

Not sure if it's any help in this particular case, but at least it'll show you that there are more than one way to skin that cat.
 
I took a small block of oak, drilled and centered and glued a dowel into it and attached a strip of delrin to the bottom. Chucked that up in my drill press and pressed them in. I still had to fine tune them with a plastic hammer. Jamie, I've got a 10" piece of wire left over that I would be happy to send you if that would help.
 
Last edited:
Unfortunately, I don't have any sort of press of even a vise...I sort of figure that I'd rather have another kit to mess around with than a vise and no kit to use it with! My workshop consists of one heavy work table and a variety of hand tools. The only specialty luthier tools I have are a fret saw, fret hammer and a U clamp.

Anyway, I've managed to get the frets seated relatively well. I've learned a bit (though I could clearly use a great deal more practice), but I'll seriously be considering a fret-press or one of those StewMac vice-grip fret press thingies.

Thanks again everyone for the help and ideas.
 
I took a small block of oak, drilled and centered and glued a dowel into it and attached a strip of delron to the bottom. Chucked that up in my drill press and pressed them in. I still had to fine tune them with a plastic hammer. Jamie, I've got a 10" piece of wire left over that I would be happy to send you if that would help.

Thanks Mr. Roper. I got through them all with a few inches of fret wire to spare.

All you folks seem to have drill presses... no fair! ;)
 
Even my 16 year old son has his own drill press. I gave it to him when he was 14!

My father's something of a handy man - more into big building projects than any fine detailed woodwork though.

When I was 16, he gave me the job of re-shingling the cottage! Doesn't seem fair...
 
This is my first day on this site so bear with me. I have never built a ukulele, but have built hundreds of fretted instruments, for a living, and your experience is not uncommon.
You might try a softer wire, and buy it by the roll, if they still sell it like that, rather than straight lengths. This gives you the arch you need. I always started with a piece longer than needed, tap gently on one end to seat that end, put your finger on top of that end, and tap softly as you go across. You can use a pair of flat nose snips to cut the end, then repeat on the next fret, etc. This was always easier than trying to pre-cut the fret. It's also faster. The flat nose snips are a little expensive, but worth it for other things, including removing frets.
Hang in there, practice, and have fun. I had a baritone uke in college,1958, and have sold many over the years, so I, too, am starting on building my own. Let me know if I can help, and I'll let you know if I need help once I'm underway.
BobL
 
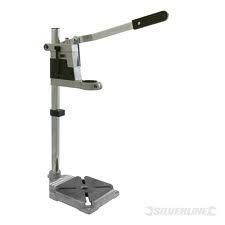
Unfortunately, I don't have any sort of press

Get one of these!..they are cheap and plentyfull and dont even need a drill in them... a lump of wood with something hard stuck to the end will do...
drillstand.jpg

Now I'm off to the fridge for another beer :(
 
I use straight wire, precut to approx. length leaving overhang, lay it in the slot, tap lightly with a fret hammer to have it stay and then I use a 6 inch long by 5/8 inch square maple piece of wood with the end grain on top of the fret wire and the 6 inch length pointing up , use a regular hammer and give it 5 to 7 good blows moving across the fret wire. Works every time. No glue necessary. The fret slot should match the fret wire, approx .022 inches. The barbs on the wire are enough to hold it in place.

Good luck,
Darryl
 
Top Bottom