Honu - Stewmac Tenor Build

BashfulPuppet

Well-known member
Joined
Feb 21, 2010
Messages
82
Reaction score
0
Location
Berkshire County, Massachusetts, USA
Ever since I was about 10 years old I've wanted to build a musical instrument. First a from scratch dulcimer that I never finished and later a guitar that never moved past the dream stage. This year I've decided take the plunge and build a Stewmac Tenor for all the reasons others have chosen the kit build route. I am aided in this buld by a friend that has luthier experience gained in building several scratch build violins. Any tool I need he has.

I have chosen not to do a step by step record of the experience in this thread. It's been done before and I've have benefited from the journals of others but don't think I need to add my journey to the annals of uke building. I do want to share a few of the parts that I think are neat.

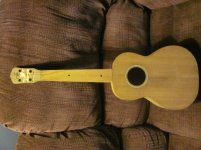
I've glued in the neck and tail blocks along with the linings, and have glued the braced to the top and the back. While I am waiting for my next opportunity to work on the the body I've decided to add some embellishments to the head stock. Inspired some of the landscapes Chuck Moore added to his headstocks I decided to try and add a scene to my headstock by removing some of the rosewood veneer to create a tropical scene. I also added a carved sea turtle to cover a minor error at the top of the head stock. Here's a picture of what I've managed to create.

IMG_0181.jpg

Oh yeah, some of you will notice that I made some small changes in the shape of the head stock. I decided that I wanted something different than what everyone gets when they order a stewmac kit.

Happy with it so far.

Ahead are plans to add a side sound port and and attacking the front and back.

Will have pictures to see how that works out.
 
Well I for one think that looks great. I may be taking on a Stewmac tenor kit build myself later this year. Can't wait to see pictures of your finished uke!
 
Hey..those carving look very nice. Very creative.
Please do update with us how it goes..

JC
 
I have a question. When I bought the Stewmac kit I chose not to get the more expensive one with the video included. So far I've been able to handle the challenge without the video but I've come to a point where I need more information than the printed instructions are giving me.

Saddle location - The instructions are very clear that the bridge needs to be located so that the saddle is exactly 17 3/32 inches from the nut. My question, is that measured to the front of the saddle or the center.

I want to make sure I get this right it would really bug me if the intonation is off.

Any help with this question will be received with thanks.
 
To the break point of the strings, shoot for the middle of the saddle. Stew Mac has an intonation compensation calculator on their website.
 
Thanks, dustartist. I took a second look at the instructions and low and behold twice they say to the center of the saddle. I think I was reading it wrong and thinking they meant to the middle of the saddle on the saddles length. Ah well, feeling sheepish. But asking a question that's already been answered is better than misunderstanding the instructions and making a mistake on the build.

Thanks again.
 
Today I got into the shop for a few hours and did some work on the uke. I had glued the top and back to the sides the last session so today I trimmed and sanded everything flush. Then I sanded the neck to fit the body and glued it in place. The joint didn't turn out a tight as I thought it might. Not sure why, it was a perfect fit when I dry fit it. Ah well, I guess I pay even closer attention next time.

On the up side I'm happy with the way the side sound port and just about every other part of the build has gone so far. I've post pictures of what what it looks like so far.

IMG_1889.jpgIMG_1890.jpgIMG_1891.jpg
 
Good job bro! I'm jealously looking on. I look forward to seeing the
results after you do the detailing on the front.

Jere
 
Today I got into the shop for a few hours and did some work on the uke. I had glued the top and back to the sides the last session so today I trimmed and sanded everything flush. Then I sanded the neck to fit the body and glued it in place. The joint didn't turn out a tight as I thought it might. Not sure why, it was a perfect fit when I dry fit it. Ah well, I guess I pay even closer attention next time.

On the up side I'm happy with the way the side sound port and just about every other part of the build has gone so far. I've post pictures of what what it looks like so far.

View attachment 34511View attachment 34512View attachment 34513

like the side sound port!
 
That is sooo cool. I've been a painter since I was 12 years old and I just go crazy happy when someone steps beyond the common line and shows the create juices that we all have in all forms of art. You got the "shaka sign" from me. My grandson (10 yrs) is building the exact thing. I got him the kit because I wanted him to learn the construction basics without the worry/training time for using scapel-type tools for now. He works in our family wood shop on weekends and loves the smell of wood. Thanks for sharing.:)
Wow, I need to follow your progress....much Aloha!
 
I know I said I wasn't going to do a step by step posting of this build but I wanted to post some progress shots of how the uke is coming along so far. As you saw from my previous posting I chose to attach the neck before gluing on the fret board. I'm glad I did. Turns out that the neck was not completely symmetrical. If I had glued the fret board on first I think it would have been very difficult and time consuming truing the neck so that the fret board was aligned with the sound hole. As it is everything went smoothly.

You'll also notice that I chose to glue in the rosette in a 2 white, 2 black, 1 white pattern, instead of the w-b-w-b-w pattern the instructions suggested.

Attached are some pics with everything sanded to 400 grit.

IMG_1898.jpgIMG_1899.jpgIMG_1900.jpg
 
Last edited:
Since I'm going to give my uke a oil finish I decided to install the bridge before finishing. Measured the 17 3/32 onto a piece of aluminum bar stock inhad and used that to locate precisely the center of the saddle and glued the bridge in place. Once the glue was cure I installed the strings and setup the nut and saddle at about 1 1/2 mm at the first fret and 3 1/2 at the 12th. The action is pretty good I may adjust it tighter later but I'll see how I like this setup for now. Intonation is spot on. I was a bit worried that I would have trouble with that but it turns out all you need to do is measure very carefully.

I've had a bit of fun playing it before finishing it has a nice warm sound. My wife is very pleased she didn't really like the sharpness of the concert I have been playing up till now. After the weekend the strings and tuners come off and the finish goes on. I post pics of the results.
 
Well I've finished the build!!! Yay! I think my wife is relieved because now I will be better able to concentrate on family projects I've been neglecting in preference for the uke. I chose to use Truoil to finish it with because after researching it just seemed that it was easy to apply and at the same time would give a durable finish. Chose to go easy on myself and not fill the pores and leave the finish more of satin and I'm very happy with that choice. It was a lot of fun and I would definitely like to build more in the future.

Here are the pics.

Jon

IMG_1901.jpgIMG_1903.jpgIMG_1906.jpg
 
Nice looking uke there bro. I hope to be starting one in late spring or early summer.
Have fun playing it.
 
Wow very nice! Congrats!
 
That's fantastic! I never thought about customizing a kit to that extent.
Glad you got your intonation right, that is one thing I would really sweat if I was building a kit.
Maybe I'll give it a shot one day....
 
Well done Jon,

It looks great. I really like the headstock. Can you talk a bit about how you measured to get the intonation right. Did you angle the saddle at all and if so.....what were your measurements?

Tom
 
Thanks everybody for all the kind words

Actually I only made two alterations to the the plan. The head stock, the corners are rounded and the sides are curved in a little plus the decorations, and the side sound port. Other than that its basically a straight up stew mac tenor.

About the intonation. I was very concerned that I get it right. It would be a nightmare to have an otherwise well built uke that doesn't play in tune. After looking at all the instructions and some of the threads here on the forum, I decided that I would just trust the instructions and not compensate the saddle or angle the bridge. I would simply concentrate on setting the bridge so that the center of the saddle was as precisely at 17 3/32 inches as possible. To do this I took a piece of 1 inch aluminum bar stock I had from a previous project, and marked it at 17 3/32 square across its width. I then butted one end at the nut and center the saddle under the inscribed line and glued it in place. The next day when I strung it up and tuned it I tested it with my chromatic tuner and all strings played exactly in tune both open and fretted at the 12th fret. Nothing complicated really just very careful measuring.

Stephen - I get over in the Shelburne Falls/Greenfield area frequently how far are you from there. The Pioneer Valley is just as big as Berkshire county.

Jon
 
Top Bottom