Vintage Neck Resets and Kumalae Neck Joint Type

Tigershark

Well-known member
Joined
Nov 5, 2012
Messages
186
Reaction score
2
Anybody on here have experience resetting the neck angle on vintage ukuleles? I'm looking for some info and hopefully some pictures of the inside of a Kumalae neck joint.
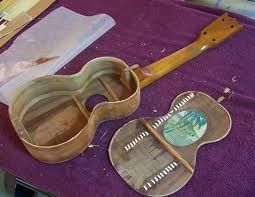
 
I believe the old Kumalae ukes were spanish heel types ...
kumalaeukerepair.jpg

There is an old film showing how they were put together..here.
http://www.ukulele.org/?Videos
 
Yes, Spanish heel. I believe the fix is to slip the back (beyond my skills).

But bear in mind that these were designed for quite high action - my own Kumalae is (from memory) somewhere between 3 and 4mm at the 12th fret, and plays just as it was supposed to.
 
That video was pretty cool. I've never seen an instrument built up in the air like that!

Still would love to see some pictures of the inside of one of these if anybody has popped a back or top or neck!
 
Can someone explain "slipping the back", please? I've never heard this term before. Thanks.
I'll go google it too and see if I can find anything on it.
 
Go to www.frets.com

You separate the back from the sides from the neck block on down to the waist on both sides, warp the whole instrument by pulling the neck angle back, and reglue the sides. Then you trim the back to fit. Without binding it's not too bad. With binding it's a pain in the ass and hardly ever looks right unless you completely rebind. You then have to do considerable finish touch up. It's fallen out of favor for all but this kind of instrument where cutting the neck off (new techniques are good...) and then bolting it on at a new improved angle is pretty much impossible.

Don't forget that a huge number of old Hawaiian ukes are really ULOs....Uke-Like-Objects...made as tourist souvenirs. They were not made to be played very seriously. They're like twenty dollar guitars from Paracho...
 
Most people call it a slipped block neck reset. Or a California neck reset. It was a primitive method for changing the neck angle in the bad old days. You really have to mutilate the instrument to do it. Here is some info:

http://www.acousticguitarforum.com/forums/showthread.php?t=138703

I wouldn't want to have this done to one of my ukes.

There may be some alternatives. The neck could be sawed off the body, the neck angle corrected, and then glued or doweled back on. Or take the whole neck & block assembly out, fill the gaps where it attached to the body with koa veneer, and recut those gaps at the proper angle and reattach. That would be slick, you might have to shave the top and shim the bottom of the part of the neck inside the body.
 
IF the uke in question has no back binding, it would be easiest to just take the whole back off, make a temporary mold, and reglue the back with a decent neck angle, then trim the back to fit the sides and do some French polish touch-up. There's barely any heel to dowel, and completely disassembling the neck from sides and likely the top is to invite total disaster. What's so hard about popping the back off...if you know what you're doing? A parting knife, maybe...just maybe a squirt of steam, and that baby is off. I doubt the glue joint is great.
 
Most people call it a slipped block neck reset. Or a California neck reset. It was a primitive method for changing the neck angle in the bad old days. You really have to mutilate the instrument to do it. Here is some info:

http://www.acousticguitarforum.com/forums/showthread.php?t=138703

I wouldn't want to have this done to one of my ukes.

There may be some alternatives. The neck could be sawed off the body, the neck angle corrected, and then glued or doweled back on. Or take the whole neck & block assembly out, fill the gaps where it attached to the body with koa veneer, and recut those gaps at the proper angle and reattach. That would be slick, you might have to shave the top and shim the bottom of the part of the neck inside the body.

Where do I start............What an absolutely unqualified and outlandish claim.

By far the easiest, fastest, least invasive method to correct the action is slipping the neck.
 
I've seen some pretty awful examples of slipped block neck sets on acoustic guitars that were nearly ruined.

I'd love to see some photos of the process or of finished work to get an idea what the results are like with a ukulele. Share some examples of your work.
 
Slipping the back is the act of removing the back. It is a step used in a slipped block neck reset.

For guitars, steel string Martin guitars, is was a repair which was previously used, nowadays, folks simple reset remove the neck via the dovetail joint.

However, if it is a Spanish heel, there no other way of resetting the neck. There is no joint between the block and the neck. What is previously described, separating the neck from the block and creating a bolt on neck, is really re-engineering the neck, as opposed to resetting it. Also on ukes, it's really challenging to convert to a bolt on due to the size.

Another scenario is on instruments with a neck set in epoxy...... (shudder)

I've done both in the past, both methods have their own specific uses. It's not super duper difficult to slip an unbound back- find an old espresso machine.....
 
I just measured my Kumalae's action - 3.5mm at the 12th fret.

It plays really nicely up to the 10th, except that the intonation on the C string is a bit out as you go up the neck (which I assume is the combination of 13 inch scale, high action and uncompensated saddle). 11th and 12th frets are mainly decoration, though usable for the occasional showing off plinky noises.

I'm sure this is how it came out of the factory in the 1920s so I wouldn't mess with it. This was a proper musical instrument, not a tourist uke, but designed for chords/rhythmic noises rather than playing lead lines. It makes a really nice sound, and is much louder than most modern ukes.

I suspect lowering the action would alter its character for the worse.

One other obstacle to slipping the neck might be the back dome, which is pronounced. What would be the technical challenges to keeping that dome once the back was off, if you changed the geometry of the body?
 
Well, the Kumalae's were made with the back brace in place bridging side to side before the back was glued on. Watch the video. One might not want to repair one that way, but it's a choice. Let's face it, those back glue joints were not modern-lutherie perfect; there's a lot of gaps filled with glue. Good practice? No, but it kind of worked.

Slipping the back is done by only half separating the back to side seam...neck block to waist. I think in this case it would be easier to just take off the whole back, and that gives the luthier a chance to actually make the geometry better for modern playing and also get that back seam in better shape than it was new.

This is not rocket science, but it is a job for someone who knows what they're doing.

Also, the job should be done with hot hide glue or not at all. That right there will separate a pro from a wanker.
 
Slipping the back is done by only half separating the back to side seam...neck block to waist. I think in this case it would be easier to just take off the whole back, and that gives the luthier a chance to actually make the geometry better for modern playing and also get that back seam in better shape than it was new.

That's why I brought this up, and what you say makes a lot of sense.

It doesn't sound hard to take these ukes completely apart. I think it's worth talking about different approaches for changing the neck angle.
 
Top Bottom