You are using an out of date browser. It may not display this or other websites correctly.
You should upgrade or use an alternative browser.
You should upgrade or use an alternative browser.
StewMac Tenor Kit: Convert to bolt-on neck?
- Thread starter joeguam
- Start date
Alain Lambert
Well-known member
This is what I used on my last one. Put a vertical dowel in the heel to get better pull.
Predrill the hole and make sure the bolt is short enough to not go through!")

Predrill the hole and make sure the bolt is short enough to not go through!
Last edited:
After quite a bit of research, I settled on these brass threaded inserts. I'm thinking I'll just use two bolt and still glue the neck first...then glue the fretboard to the neck/top afterwards to align in properly (Pete Howlett suggests to use glue and the bolt).
Can anyone lend any advice on my strategy?
Can anyone lend any advice on my strategy?
Timbuck
Well-known member
After quite a bit of research, I settled on these brass threaded inserts. I'm thinking I'll just use two bolt and still glue the neck first...then glue the fretboard to the neck/top afterwards to align in properly (Pete Howlett suggests to use glue and the bolt).
Can anyone lend any advice on my strategy?
One insert is enough
One insert is enough
I figured that, but I thought I'd put two for positioning. So maybe I should do one bolt at a dowel? I'd still glue it up as well.
chucksurette
Member
Joe,
How far along are you with the build?
I read your post and recalled watching this guy have issues with the dowel joint.
http://youtu.be/1mMeSJd7AxU
The hangar bolt/insert should be easy if you have enough meat to tap into the heel and still have access to the neck block. I'm pondering the same thing with my build (neck joint) but still have the neck to build up, before I get there.
Chuck, I haven't started my build yet. I'm a Sr. Project Manager by profession so I'm forcing myself to go through the plan/define/design phases before I build (even though I really just want to get started building right away!). I'm a woodworker by hobby and have a bunch of furniture builds under by belt, but this will be my first instrument. Eventually, my dream is to build a tenor uke from scratch. I'm looking for a course that fits my travel schedule, so I've also started this thread:
One week ukulele build course on west coast?
I opted to use the brass threaded insert instead of a hanger bolt because my research shows that the insert can be better fastened into the neck heel when epoxied (which is what I'll be doing). I thought about the hanger bolt first as it would be easier, but the threaded insert and regular bolt is just a cleaner and stronger implementation.
From experience, only putting one fastening point (i.e. just the one bolt) will allow the two pieces to spin on that single point. I know that the one bolt by itself will be sufficient clamping pressure for the neck joint (considering I'll also be gluing it), but a second fastening point is needed to hold alignment. I'm thinking that I have two options at this point:
1. Use two bolts (like the Taylor guitar method): If I go this route, I could make the through-holes in the neck block slightly larger than the bolt to allow for slight adjustment when gluing
2. Use one bolt and a dowel: If I go this route, I'd have to make sure the hole for the dowel is perfectly positioned or the neck will be misaligned. This is my entire issue with using dowels altogether and also the issue the guy had in the video you posted - I don't trust the alignment of the holes due to drill-bit-drift. I don't prefer dowel joints at all, so I don't want to go through the hassle to make a jig for it.
So I guess I'm leaning towards the two-bolt option, but would really appreciate some advice from those with experience. Either way, I'll be gluing the fretboard to the neck and top after I join the neck to the body first.
Gyozu
Well-known member
Look into using a bed bolt with a barrel nut for attachment. If you are a belt and suspenders kinda guy you could add in a couple of 1/4" pins/dowels to prevent rotation. Personally, I wouldn't overcomplicate the joint. A bit of glue should keep things located. I've read about people adding a few grains of sand to the glue or using clipped staples to avoid slipping, but I have no direct experience with that.
Thanks Gyozu, now I'm a bit more unsure of what to do.
As I research and read more and more to learn from the challenges and mishaps that others have encountered, I think I might be changing back to my original plan of using one bolt and one dowel. I was trying to find a way to eliminate the challenge of properly drilling the dowel holes without a jig, but it seems like I'll have to tackle it head on like everyone else.
So now it seems I'll be using:
- One bolt with the threaded insert: For the best "clamping force"
- One dowel: For alignment and stability
- Glue: The "insurance gasket" as Dave Means calls it
Either way, I'm excited for this first build because I'll be learning a lot. I'm pretty sure I'll know what changes I'll make for the next build.
Thank you all for the responses, if there's anyone who has any additional advice to help me, I'd be so grateful.
Masonguitars
Active member
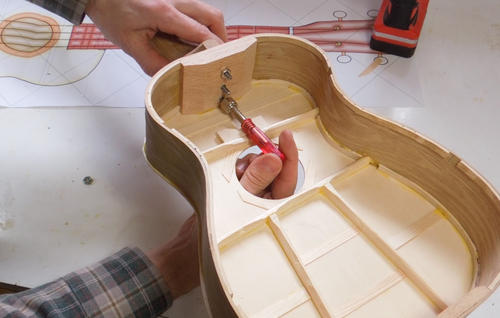
An additional thought that hasn't been mentioned yet, and maybe you've already thought about it. Carefully consider how you will get inside the box to attach the neck with which ever bolt system you use. The sound hole is very small and there is not much room to work. I do hangar bolts (two for a tenor even though it is probably overkill) and epoxy them into the neck. And I use nuts with grabby ridges on the bottom of the nut (what are those called?). I use a small ratchet wrench with whatever attachments give enough room to turn. I used to glue the tongue of the fingerboard to the top, but up as I improved the fit of this type of attachment, I found the glue to be unnecessary. Besides, it kind of defeats one of the main reasons for bolt on--easy removal.
Masonguitars, would you mind sharing some pictures of your neck joint/bolts to help me? Do you size the hole in the neckblock larger than your bolt? If so, how much larger?
So now I'm considering another option, two bolts with no glue.
So now I'm considering another option, two bolts with no glue.
Sorry Masonguitars, I forgot to mention, I will be using a small ratchet that I have to tighten the bolts. I actually read an article online with someone cautioning this very same thought. Thanks!
Here is the article I found with the caution and the small ratchet: https://woodgears.ca/ukulele/neck.html
You gonna rely on a video of a gadget guy? I think I would trust a professional
Sven
Well-known member
I fit my necks to the body before I glue the back on. Then it's very easy to reach the screw (I use a barrel bolt and a machine screw, plus glue). I would think that a barrel bolt is better than a threaded insert set into the end grain, of course you need to look at your heel design and size so the barrel bolt sits at a decent distance from the absolute end of your neck.
I usually aim to set the neck straight (of course) to the centerline, and flat in regards to the upper bout which in my case is flat. Only the lower bout is domed. Then when I glue the back on I put a shim under the neck to get the correct neck angle, and let the back hold the ever so slightly distorted sides in place. The back covers the heel so I don't make a separate heel cap.
But my way of doing things is a hybrid method, and in some regards an ass backwards way of working. If anything, it's very simple and stress free.
Sven
Masonguitars
Active member
Masonguitars, would you mind sharing some pictures of your neck joint/bolts to help me? Do you size the hole in the neckblock larger than your bolt? If so, how much larger?
So now I'm considering another option, two bolts with no glue.
Sorry, but I don't have any pictures, but if I did, my joint would look very much like the picture you posted. I do make the holes slightly over sized. Someone with better skills could do it more precisely from the beginning, but I find myself futzing with the fit, taking the neck on and off right up to stringing up the instrument. This always means opening up the holes a bit. With the ratchet, I use an L-shaped ratchet so I don't have to get my fingers inside except slightly to steady the tool and make sure the nut is started straight on to the bolt.
resoman
Well-known member
I had been struggling with other wrenches until I saw this set at Lowe's when I was trolling the tool department.
http://www.lowes.com/pd_338552-2232..._product_qty_sales_dollar|1&page=2&facetInfo=
The ratchet has just the right offset and is magnetic so the driver itself stays in the ratchet. I'm generally using 10-32 button head screws with an allen driver I had that is just the right length. Has worked great for me anyways
Last edited:
Thanks Terry for this suggestion, I had actually been wondering which bolt I would use. I was literally going to measure the length needed and take the threaded insert to Home Depot and just start hunting in the nuts/bolts aisle. It looks like they have lots of different lengths in the button head screws so I'll probably us that design.
It looks like they have lots of different lengths in the button head screws so I'll probably us that design.resoman
Well-known member
Joe, I'm also using a dress up washer that spreads the pressure of the screw out over a greater area. Kind of a fancy stainless washer
Similar threads
- Replies
- 165
- Views
- 27K
- Replies
- 14
- Views
- 1K
- Replies
- 23
- Views
- 3K