Island Uke ... New Project

Timbuck

Well-known member
Joined
Mar 10, 2009
Messages
6,617
Reaction score
1,891
Location
Stockton on Tees..North East UK.
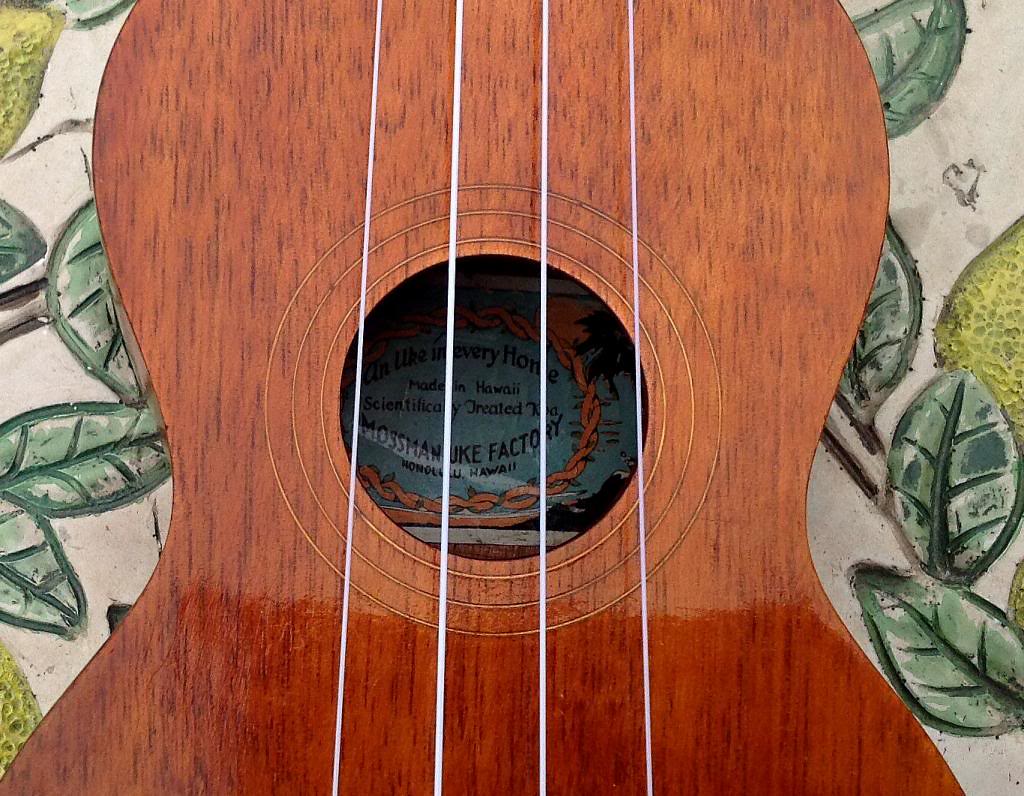
I was getting fed up of making the Style 0 sopranos..So I decided to start a new project...I'm going to make a few Island style soprano's.
When I restored a vintage "Mossman soprano" a few weeks back it gave me the chance to make some drawings of it and take an accurate dimensional survey of it...I intend to build them in the traditional way with hide glue and string and the same inside out violin type jig/mold with the spanish heel construction that they used back in the 1900's..I'll try and document my progress as I proceed.:)....I made a start today on the mold and this is how it looks so far...
IMG_1674_zps9db7f105 by Ken Timms, on Flickr
 
Last edited:
Thanks! I love watching your projects develop.
 
looking forward to seeing how this progresses!

And I have a funny feeling I'm going to want one when they're done.
 
Nice work Ken. Please tell me about the fence on the bandsaw. Did it come with the saw or did you add it yourself? Thanks
 
Next bit is making the radiused wedges that clamp the uke sides to the mould at the waist....luckily I have just the tools for this job.
First turn a block of hardwood into a round shape same radius as the waist 1" Rad = 2" Dia plus a bit off to allow for the side thickness, in this case .050" so .100" has to come off the 2" diameter.
IMG_1703_zps090d2005 by Ken Timms, on Flickr
IMG_1713_zps844a886a by Ken Timms, on Flickr/shiregreenbod/IMG_1713_zps844a886a.jpg[/IMG][/URL]
This is where they go on the jig.
IMG_1719_zps1f35f848 by Ken Timms, on Flickr
And then a couple of small wedges knocked in to secure them
IMG_1729_zpsaf8be464 by Ken Timms, on Flickr
 
Last edited:
Ken you've really been studying that old old video of Hawaiian Ukulele building, haven't you?. You're also gonna need a pair of bib overalls, a pocket full of wedges, small hammer, some twine, and an enormous chisel!

Are you gonna make your assembly video in black and white?
 
There is nothing in that old movie that shows how they made the necks...So I just had to use my noggin and go with the sketches and pics I had...If I had a Draw knife or a Spokeshave I could have done it quicker but I ended up with some thing that looked ok in the end..I used some Ash to make the neck co's I only had Koa sets for the body, but I recon when it's done no one will notice :)...Pete Howzatt, will be wanting to know what I'm going to do about "The Step" (anyone who uses the Spanish Heel method will know what I mean) well! I'm trying a method I thought up for that, by inserting a shim in the jig the same thickness as the top plate....I hope it works :rolleyes: here's some more pic's.
IMG_1732_zps3805e03f by Ken Timms, on Flickr
IMG_1738_zpsc9611d21 by Ken Timms, on Flickr
 
Last edited:
Ken you've really been studying that old old video of Hawaiian Ukulele building, haven't you?. You're also gonna need a pair of bib overalls, a pocket full of wedges, small hammer, some twine, and an enormous chisel!

Are you gonna make your assembly video in black and white?

From the in jokes I guess it is this video.
http://www.ukulele.org/?Videos
or
http://youtu.be/MxapCiRm278

Fascinating techniques and skill levels. - Why is he bashing the fret wire before he puts it in? Why isn't he using a regular old carpenter's hammer to bash them in?
Did I catch a glimpse of the tail block being stapled in place?
The arch in the back brace seems to need no fancy radiusing dish. Are we over thinking all this stuff?

Even accounting for the showing off factor I expect he would have a dozen knocked out before morning tea.
 
I'ts what they don't show in the film that takes up the time...Resawing timber planing and sanding the plates... Carving the neck, cutting fret slots..Bending sides and dry fitting to cut to length ....I believe a radius type dish was used before the back was fitted otherwise you wouldnt get a good enough fit (as I found out restoring one) in the film we are looking at several ukes and workers at different stages in the build, and you have to allow for the hide glue drying don't you....The Guy fitting the fret wire is bashing the wire with a very sharp blade to put nicks in it so it will grip in the fret slots..You can see this on old vintage instruments when you remove the worn out barfrets..and yes you did see staples in the tailblock...Staple guns were invented in the late 1800's and were available. see here http://en.wikipedia.org/wiki/Stapler how long would it take to sand the uke and and finish the shellac to a marketing standard ? in total about 30 man hours went in to making a uke in those days, maybe more?..and if you wanted rope binding :rolleyes: Who knows how long.
 
Last edited:
Cutting the Rosette Channels

This one is something that is causing me to think a lot :confused: Three channels cut at approx: .015" wide for white celuloid rosettes..How can i do this without splintering the wood and making the job look neat ? I'm thinking of making a cutter that will do the three rings in one go, with the cutting bits made from HSS darning needles...Maybe coating the workpiece with shellac to stop splintering ??? It looks as if it's time for experimenting..Is there anybody still alive who has done this before?...any advice and ideas are welcome.
IMG_1261_zpsa8ef553d by Ken Timms, on Flickr
 
Last edited:
For the first one off..I've decided not to use any of my Koa stock but make it from African Mahogany, until I know what i'm doing..And it's a good job I did as I ruined the first set of sides by bending them wrong :mad:...But my 2nd attempt was more successful :)
I got the hide glue pot up and running today and this is where I am so far.
IMG_1754_zps9be6baa0 by Ken Timms, on Flickr
IMG_1752_zpsc314bb3e by Ken Timms, on Flickr
 
Last edited:
Top Bottom