Kit or do-it-from scratch ?

I've bent sides by using my wife's iron. Apply the iron over a very damp cloth and it will drive steam into the wood. You may have to re-wet the cloth a time or two. You then have to work quickly to get it into the mold and clamped down to shape. I've done it with maple, and with spruce - it may work with mahogany. It's worth a try.

It is not difficult to make a tubular bending iron of the old traditional sort. The modern "blanket" benders are highly desirable, but you don't NEED one for hobby work.

Ukantor.
 
A simple bending pipe - length of 60mm steel tube, propane torch and a vice to hold it in. Go to Dave's videos to see how it's done.

As a side note and without meaning to be rude... you are asking lots of questions here which are fully and probably better answered by a search through the YouTube library. Try there first - it's like being in a luthier's workshop with the benefit of a comfy chair.:nana:
 
Pete's right. No need for a big investment on a bending iron. An 8" length of 2" galvanized pipe and a propane torch will work fine. Should cost you about $10 for the works. Although I use heat blankets I also use the hot pipe for cutaways and touch up work.
 
>you are asking lots of questions here which are fully and probably better answered by a search through the YouTube library

Wow... I spent hours founding only one website giving few information about the DIY bending iron, but in five minutes I found 3 detailed video on ebay... thanks for the hint :S

On question I could no found the answer for, is what exactly do we use the bending iron for. I imagine that it :
-First heat the wood / water, which help changing the shape
-Then evaporate the water, then the wood is no longer flexible and retains the shape

If this is how it work, I coul also do as I describbed : use steam in a barell to soften the wood, then let it dry for two days in mold. Is this just to much time consuming for pro luthiers, or would it just not work ?

Regards,
John.
 
Wood is made up of cellulose and lignin - it is therefore technically what we might understand as a thermo plastic or more accurately a partial thermo setting plastic since it always wants to straighten itself out after being bent (or tortured as my college lecturer would say). The water does nothing but stop the wood from scorching. It's the heat that weakens the molecular bonds in the cellulose that allows you to bend the wood. The micro structure and other mineral constituents of the wood you are bending play a huge part also - just try bending some African Blackwood...
 
Hi,

I think that I'm now taken my decision :
-I'll start with a $25 ukulele grizzly kit, on which I'll replace the top (and maybe back ?) with solid something (we have some spare brazilian walnut at the club I think, maybe this will fit, or some spruce from north of europe)
-I'll then start to build one from scratch during summer. I'll use the grellier plan, but make a flat back (let's not pick a too difficult thing for a first try)

I have to approximatively plan the work, to know when I need to be at the club, and when to start (because I'm not sure that the club is open during whole summer). My actual estimation is that, for a first projet, it will be around 100 hours of work, with about 50 which required the tools in the workshop, 30 that I can do myself (everything that is done with sandpaper, glue, finish, and making the files for the CNC...), plus another 20 needed to correct errors, go buy some supplies, ... Working about 4 hours a day on it, il would mean I need 25 days, 13 week-ends, 3 months.

Does it seem a good aproximation for a first music instrument project ?

Thanks,
John.
 
Hi John.
First, what the others already said makes a lot of sense.

Second, I would recommend (when you eventually will build from scratch) that you consider buying the Hana Lima book. Full of good instructions.

Third, my journey so far has been exactly like yours will likely be. I built a kit (a Brueko kit) and then I built a tenor from scratch. I have years of woodworking experience but no luthier training before that. I have made a primitive blog about all this, if you can bear the crudeness you might find something that inspires you. www.argapa.blogspot.com It starts with the uke kit because it was then I found the blog function on the cell phone.

I wish you the best of luck. Did you find the grellier plans by the way? I think I gave a link in a recent thread on this forum.

Sven
 
Hi,

I am waiting for the hana lima manual to arrive and (ten more days). I have been given some spare quarter sawn sipo, which looks nice and is dry. So I think I'll use it for back, top, sides and neck unless I am adiced not to do so.

I'll use the Martin 1940 ukulele plan on Christophe Grellier's website.

The plan shows the height and width of the neck, but not the precise profile. Is the profil an ellipse which whom diameters are the height and width of the neck ? Is the larger diameter of the ellipse on the top of the neck, or on the top of the fingerboard ? (of course I guess most answers to this question will be in the hana lima book, but I may be forced to take 2 days off by the end of the week, and won't have received the parcel yet :) )

Regards,
Fabien.
 
Reading this thread makes me feel like I am in a straight jacket...in the sense that....my hands are kinda tied (aside from the fact I am crazy lol).

I got heavily into blacksmithing/bladesmithing for a few years. I went out to all kinds of events, struck up a few friendships with guys who had their own shops and such...but in the end I had to let it rest. I became increasingly frustrated that I couldn't do it whenever the mood struck me as I live in an apartment. About the only thing I could do was hand file down my blades....which is tedious and tiring to say the least.

I would LOVE to make a uke from the ground up..but it's just not hapnin here in an apartment lol.

So, yeah..if you have a desire and place to do it...build you an uke and let the rest of us live vicariously through you. :p
 
>So, yeah..if you have a desire and place to do it...build you an uke and let the rest of us live vicariously through you.

I'll post picture as soon as I really start. But there are chances that woodworkers (or metalworkers) club exist near your place. I've been looking for one for long time, but then suddenly found 3 differents ones. Those guys just don't appear to make websites, so you have to find someone who can tell you where they are :)
 
I would LOVE to make a uke from the ground up..but it's just not hapnin here in an apartment lol. :p

I made my first copy of a "Fender Jazz bass" in a multi storey block of flats..I lived on the 14th floor...I carved out the neck from a solid lump ..I cross sawed lots of cuts along the back of the neck and then proceeded to remove the unwanted timber by chopping the lumps out with a 2 inch chisel and a hammer.
The heel end of the wood/neck was resting on the floor of the flat and I spent most of the evening hammering and shaping the neck...The next day everybody who lived in the block were full of complaints "of a noisy neighbour who was building a boat somewhere in the block"..I said "yes! it was disgracefull it spoiled my night too"..luckily the building complex made it difficult to Zero in to find the real culprit...Where there's a will there's a way.;)
 
Last edited:
>So, yeah..if you have a desire and place to do it...build you an uke and let the rest of us live vicariously through you.

I'll post picture as soon as I really start. But there are chances that woodworkers (or metalworkers) club exist near your place. I've been looking for one for long time, but then suddenly found 3 differents ones. Those guys just don't appear to make websites, so you have to find someone who can tell you where they are :)

Hmm interesting. I may have to look into this.

Thanks for the tip! :shaka:
 
I made my first copy of a "Fender Jazz bass" in a multi storey block of flats..I lived on the 14th floor...I carved out the neck from a solid lump ..I cross sawed lots of cuts along the back of the neck and the proceeded to remove the unwanted timber by chopping the lumps out with a 2 inch chisel and a hammer.
The heel end of the wood/neck was resting on the floor of the flat and I spent most of the evening hammering and shaping the neck...The next day everybody who lived in the block were full of complaints "of a noisy neighbour who was building a boat somewhere in the block"..I said "yes! it was disgracefull it spoiled my night too"..luckily the building complex made it difficult to Zero in to find the real culprit...Where there's a will there's a way.;)

I won't even go into the story of my crazy neighbor upstairs who comes down at 3;30pm on a Sat. afternoon because I was hammering in a few nails to hang a picture up.

I'll just say I have a "nighttime' ukulele. :rolleyes:
 
Is the profil an ellipse which whom diameters are the height and width of the neck ? Is the larger diameter of the ellipse on the top of the neck, or on the top of the fingerboard ?
I was gonna show you this as an example
http://s219.photobucket.com/albums/cc143/shiregreenbod/?action=view&current=58a9b087.pbw
but I watched it again and realized I'd gotten it wrong. Still it's an amazing slideshow, also check Timbucks other stuff at photobucket.

Anyway I thought it was the same radius, but the centerpoint gradually moved higher above the fretboard closer to the nut. (hard to put in writing!) This would give you the tapered sides as well. Seeing the slideshow now I realize the taper is set on the lathe and I'm lost in geometry. Seems you should go for circular, not ellipses.

Ken, lay off the booze and help me out goddammit..!:mad:

Sven
 
If I understand the picture correctly, the neck + fredboard makes a half-round profile, then you jsut need to know the height of the neck to have its width.

I'll check on the plans if have if (neck height + fretboard height) *2 = fretboard width on first and 8th fret !

Thanks you,
John.
 
You need not have worried about the distractions of sun and sand in Hilo. There are no sandy beaches and there's not much sun either. Definitely no money, especially these days.

Ain't that the truth, Hilo when it's not raining it's overcast, perfect place to spend allot of time indoors honing your ukulele making skills. I LOVE Hilo, and will retire that side of Big Island one day since I like to read, and play ukulele, but also fish, and hunt wild boars which there's plenty of. :shaka:
 
I've bent sides by using my wife's iron. Apply the iron over a very damp cloth and it will drive steam into the wood. You may have to re-wet the cloth a time or two. You then have to work quickly to get it into the mold and clamped down to shape. I've done it with maple, and with spruce - it may work with mahogany. It's worth a try.

It is not difficult to make a tubular bending iron of the old traditional sort. The modern "blanket" benders are highly desirable, but you don't NEED one for hobby work.

Ukantor.
I've done some boat building over the years and to make wood flexible I've soaked in water as well as made inexpensive steam tubes to place wood in that needed bending. Very easy to make a steamer with metal pipe, and a heat source.
 
I was gonna show you this as an example
http://s219.photobucket.com/albums/cc143/shiregreenbod/?action=view&current=58a9b087.pbw
but I watched it again and realized I'd gotten it wrong. Still it's an amazing slideshow, also check Timbucks other stuff at photobucket.

Anyway I thought it was the same radius, but the centerpoint gradually moved higher above the fretboard closer to the nut. (hard to put in writing!) This would give you the tapered sides as well. Seeing the slideshow now I realize the taper is set on the lathe and I'm lost in geometry. Seems you should go for circular, not ellipses.

Ken, lay off the booze and help me out goddammit..!:mad:

Sven
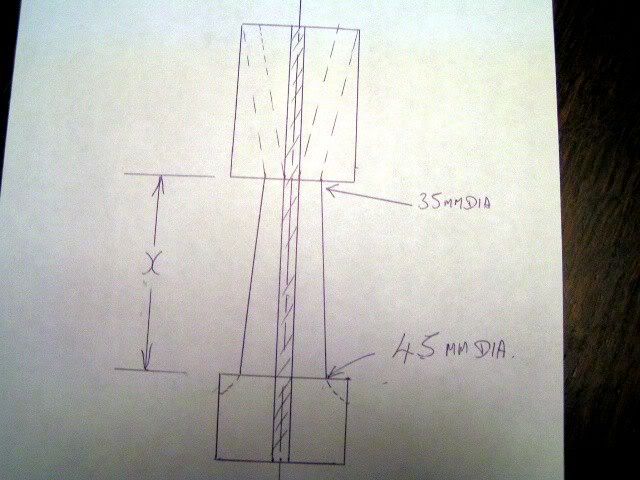
It's too difficult to explain whats going on without diagrams but the neck part is just a long tapered cone with a slice cut out of the middle..Thus giving two neck parts... Like this (the dimensions are just approximations they have to worked out to get it right)
PICT2844.jpg
 
Last edited:
Top Bottom