Interesting tips/tricks gleaned from the luthier's lounge

xtoph

Well-known member
Joined
Jun 16, 2011
Messages
51
Reaction score
0
Location
Rocklin
So for the past couple of days I've been working my way through the posts in this forum and learning a TON about building ukes. I've built a couple of grizzly kits and am trying to build up courage to try a stew-mac kit. I started a word doc of interesting tips that I've found and I thought it would be nice to share them (paraphrased):

For tracing the top with a small border, use a washer on the tip of your pencil to trace around the template. Pete

To make a perfectly round sound hole, attach sandpaper to a funnel and use that to perfect the circle. Argapa

Drill press used with dowel to insert frets into fret board. Also, insert frets from the spool rather than cutting them all out. Pete

To practice inlay, print out the alphabet and tape it to a piece of scrap, then rout out all the letters. Moore

Broken pieces of glass can work well as scrapers, especially a bottle for shaping a neck. Also you can use microscope slides. – Various (Pete Howlett thinks this is a silly idea and would rather use metal)

These are just the few I have collected so far... Anyone have any others?
This is a great idea. I missed a few of these. Maybe we can start a sticky with categorized tips. I have to go back now and find Pete's post about the drill press used for inserting frets.
 
My top tips:

Instead of 'inventing' a 6 bladed razor because your competitor has released one with 5 blades, why not think ahead and release one with 7 blades!

or

Place a sawn off piece of exhaust pipe in your mouth in an attempt to fool your Dad that you've swallowed his car!

or

Save yourself much trouble when fretting. Cut a wide slot and glue the pesky things in. It has many advantages.
Thank me later.
 
At last I've got a tip that helped out someone. :eek:

The one I've found particularly useful for set up is to place a 1/8" drill bit or similar on the space next to the 14th fret. Then lay a straight edge over the fret board from the 1st fret, resting on the 1/8' drill bit and shooting over the saddle slot. Then measure the distance from the bottom of the saddle slot to the edge of the straight edge to give you the measurement to dimension the saddle for the very close to spot on relief at the 12th fret.

When you have a class of students little tricks like this get you through the day a lot quicker. And you know what. It really helps on the work bench with just one instrument to do as well.
 
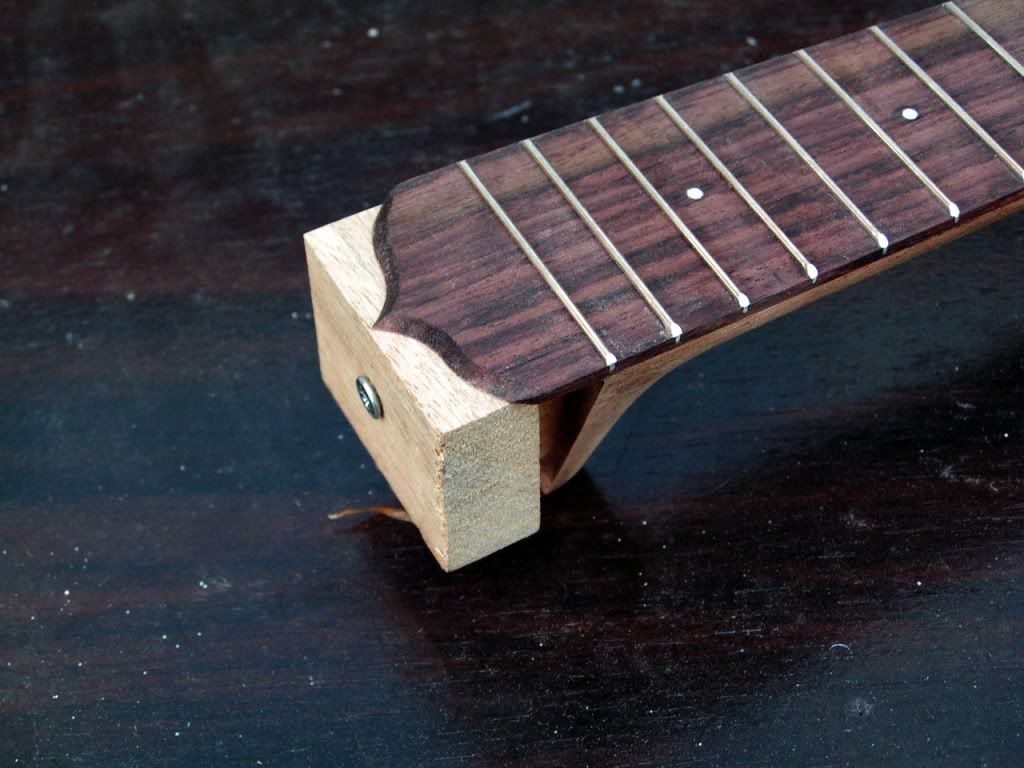
Screw a block of wood into the heel to protect the fingerboard extension (especially the pointy bit) during sanding and finishing ..one short drop to the floor and it's doomed.:mad: (voice of experience speaking)
PICT0037-5.jpg
 
At last I've got a tip that helped out someone. :eek:

The one I've found particularly useful for set up is to place a 1/8" drill bit or similar on the space next to the 14th fret. Then lay a straight edge over the fret board from the 1st fret, resting on the 1/8' drill bit and shooting over the saddle slot. Then measure the distance from the bottom of the saddle slot to the edge of the straight edge to give you the measurement to dimension the saddle for the very close to spot on relief at the 12th fret.

Excellent Idea! I always put the striaght edge up against the saddle and wished I had a third hand! Instead of drill bits though, I use small blocks I made out of old Snap-On feeler guages. They won't roll away on you.

The best tips I got from here are from Chuck. Use B-grade fingerboards for binding ( I cut them up for binding, faceplates, bridges and heel caps) Also the most important one - "keep building"

OK, back to the real job and updating index of refraction charts--blah!
 
At last I've got a tip that helped out someone. :eek:

The one I've found particularly useful for set up is to place a 1/8" drill bit or similar on the space next to the 14th fret. Then lay a straight edge over the fret board from the 1st fret, resting on the 1/8' drill bit and shooting over the saddle slot. Then measure the distance from the bottom of the saddle slot to the edge of the straight edge to give you the measurement to dimension the saddle for the very close to spot on relief at the 12th fret.

When you have a class of students little tricks like this get you through the day a lot quicker. And you know what. It really helps on the work bench with just one instrument to do as well.

Alan, I love this tip! Even through I don't build ukes its a great way to check the set up on existing ukes.
 
I got this one from Mike DaSilva years ago. For initial roughing out for nut setup. With nut blank in position lay a steel card scraper on the frets and slide the end up to the nut. Mark a pencil line where the scraper meets the nut. Filing your strings slots into the pencil mark will get the action close. More often than not you have to go a little deeper for proper setup. But this gets you in the ballpark quickly.
 
I got this one from Mike DaSilva years ago. For initial roughing out for nut setup. With nut blank in position lay a steel card scraper on the frets and slide the end up to the nut. Mark a pencil line where the scraper meets the nut. Filing your strings slots into the pencil mark will get the action close. More often than not you have to go a little deeper for proper setup. But this gets you in the ballpark quickly.

A half-pencil, one that has been sanded lengthwise makes an ideal marking tool for nut slot depth.
 
A half-pencil, one that has been sanded lengthwise makes an ideal marking tool for nut slot depth.
Yup, I've known about that one too Chuck but for some reason I'm always misplacing those modified pencils but I seem to always know where to find the scraper :eek:.
 
Top Bottom