Hobo
Well-known member
Great! All that and install a faucet in the same day... multi-tasking!!")
Looking good. I glued my top on tonight also. I'm wondering why the kit doesn't have a bridge plate? The two kits I've built both had bridge plates. I'm wondering if it would be good to add one before attaching the back. I don't know?
Ed,
Looking great bud. You are moving right along. Will you put binding on this kit too?
Tom
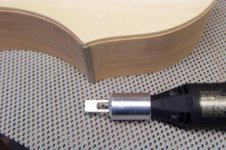
A slightly less stressful way to trim the top. Will still have to finish up by hand.
Top trimmed and walnut corner blocks worked down. I may have to re-think the binding. I was going to use a double layer of walnut veneer but those tight corners will be awfully weak. I figured I'd miter them but it would be sure to chip and break the first time it caught on a pants leg.


I'm back to work on this project. The tortoise binding arrived today from C.F. Martin.