Fretboard to headstock binding transition

bigphil

Well-known member
Joined
Dec 4, 2012
Messages
477
Reaction score
0
Location
Davenport, Iowa
How do you handle blending neck/fretboard binding into head stock binding. Since the fretboard is glued to the surface of the neck and thus at a higher level how do you gracefully blend it to a bound headstock. I've been trying to find photos of this sort of thing but am finding basically front shots.

Also does this require cutting a custom piece of binding for that type of application. In other words, not just a straight strip?

As always, thanks in advance for your insight. This place is great!
 
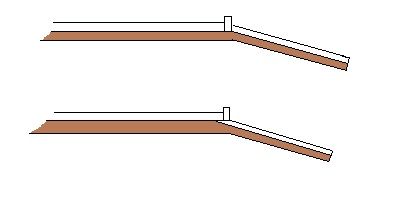
Thank you for the picture, however, the picture of the guitar doesn't match how my neck will align. In that photo it appears the fretboard is basically level with the end of the headstock. So the binding looks pretty much like a straight shot between the two. My fretboard will be glued on top of the neck and thus stand above it. Easier to describe with a picture so I drew this. The red strips represent the binding.
neck.jpg

The fretboard binding could end at the nut and have a seemingly logical termination point but the headstock will just end abruptly. That's what I find odd. So is there some technique to deal with this or is it common to just end the binding like I drew it.

On a side note, I attended a Lil Rev concert last night and was able to examine his Mya-Moe ukes. His fretboard was bound but they just didn't put binding around the headstock so I guess that is one option. That would not my first choice though. Anyone else?
 
Chuck Moore does this transition the neatest that ive seen.

I bind my FB and headstocks and the bindings have a BWB purfling on the bottom and to miter and match up those are the most difficult thing.

ive done it a few different ways,
1- Glue fingerboard on first then bind the headstock, cutting by hand the transition and mitering it all in.

Another way is:
2- make/bind headstock with the binding in the transition glued in long. then cut the purfling at a right angle to the neck and position and butt up the fingerboard to it- however doing this you have to cut back the FB bwb's as well as mitering them perfectly.

A more expensive in materials option
3- use BWB veneers under the headstock top plate- these bwb veneers will look/act like binding purfling. Rout down to (just shy of or touching) the top veneer and bind as usual- This creates a bound with purfling look and it also ensures that all your "purflings" match or 'miter' up perfectly under the binding. You could then put your nut on the slope (and on top of the bwb for a nice clean look) and but this bwb veneer up against the fingerboard's bound with purfling bwbs'

Either way, i have found it to be very difficult.

Also, concerning option 1 or 2 above, putting the nut on the flat part of the neck, ie not on the headstock's slope like on a Martin, gains you some space in that is makes less work as there is less material to have to butt together. DO a drawing and see what i mean.

PPS- use a darker binding- dont try it with maple on your first go.

PPPS- dont use superglue near the bwb miters
 
I've seen the bottom option of the drawings in post #5 used on Mainlands and Ohanas. Just take the drawing you submitted for the post and extend the bottom line of binding on the head stock so it meets the line of the binding on the fret board. Ending it abruptly like it's currently drawn wouldn't look right.
 
Thanks everyone for your input and suggestions. I guess I actually didn't include enough detail in my original post to clearly illustrate my problem. I've already purchased bloodwood bindings that have a very thin basswood trim/accent strip. They are intended to compliment the back strip and rosette I've already built into the top and back. So I'm pretty much going to stick with this material.

I've considered the method shown in the line drawing that Ken posted. That would give me this I don't want the white strip to be doubled in the overlap area as this shows.

neck1.jpg

I have looked through Chuck Moore's galleries too and his look pretty cool indeed but I can't find a clear picture to show exactly what's going on. His photos are mostly from the front, he's clearly a master of inlay and ornamentation!

I'm beginning to hedge on the idea of binding the headstock. Referring to the picture I posted above, I could probably remove white strip in the area that it would be overlapped by the headstock binding and then miter the headstock binding to it. I'd be pushing my abilities though. As I said, the white strips are already on the bindings so it would be pretty tedious to get all matched up. Especially coming around the curve on the headstock where it is narrowing down to the width of the neck.

Maybe I'll just have to settle for the fretboard only this time around. Thanks again for your input!
 
Last edited:
Here is how I did it my first go round. I am sanding the epoxy fill at this point, ready for the final coat of epoxy. This is a Black Limba neck with Curly Maple binding. I made a thicker headstock veneer, glued it with epoxy over the BWB fiber sheets on the top of the headstock, carefully aligned. The BWB for the face of the headstock veneer was done before gluing, but the binding was glued after.

 
Last edited:
only on the bindings. I wanted wood to wood contact between the fingerboard and the neck. I glued a bound fretboard to the neck with epoxy. I did glue 3 sheets of fiber to the top of the headstock though, under the veneer. I also built up the headstock veneer with 2 woods, as it is Snakewood, and I did not want to see it crack, so I kept the Snakewood to about 2mm.
 
oops! I fibbed... I just remembered that the headstock BWB is not done with sheets, it was individual pieces. I think there are a lot of ways to do this...


Double fibbed.. I cut binding ledges into the top of the neck with a router bit before gluing the fingerboard down. (not for the headstock though) I would have to think about how I did it.. I don't remember.. I may do it slightly different next time anyway.
 
Last edited:
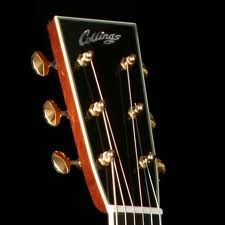
Not to hijack my own thread but I have a question for you too Beau. The photo in your signature is beautiful. I love that end graft but I'm more curious about how that headstock was done? Looks awesome!
 
So Chris, your headstock veneer is as thick as the binding then?

No. It is slightly thinner. It took a little thinking about all of it to decide exactly how to do it, all of the different relationships going on.
 
Not to hijack my own thread but I have a question for you too Beau. The photo in your signature is beautiful. I love that end graft but I'm more curious about how that headstock was done? Looks awesome!

Thanks- that headstock binding with the "fading purfling" is pretty hard to do and required about 10 glueing steps. I use an exacto knife and thin japanese saws to dig out wood to fit the purfling in. There are some pics somewhere on my facebook page
 
No. It is slightly thinner. It took a little thinking about all of it to decide exactly how to do it, all of the different relationships going on.

oops again.. yes, the headstock veneer is as thick as the headstock binding. It is not as thick as the fingerboard binding.. Can't think today for some reason...
 
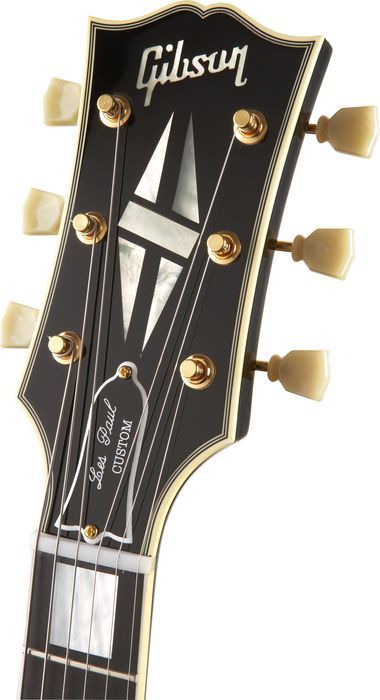
Here is the picture I was looking for. Chuck's work is amazing! It appears he mitered the headstock binding to the fretboard binding.

Z4.jpg
 
Here is the picture I was looking for. Chuck's work is amazing! It appears he mitered the headstock binding to the fretboard binding.

Z4.jpg

Yep, that's how.
BTW, if you're using fiber sheets under the head stock veneer on a slotted headstock, make sure you clamp it under "extreme" pressure or you'll get blurry lines on the ramps.
 
Top Bottom