Bad Day in the Uke Shop

sequoia

Well-known member
Joined
Oct 22, 2014
Messages
3,360
Reaction score
515
Location
Little River, California
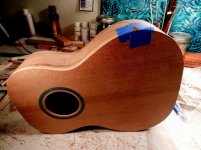
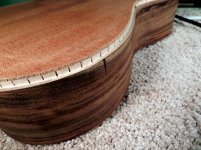
Sometimes when bad things happen in the uke shop you think, "it ain't that bad. I can fix that", and sometimes you realize, this ain't good. Not good at all. Bad day all around. Was bending binding when my careful perfling delaminated really bad. That is fixable and I can makes things OK, but later I ran into my sides with the band saw cutting away waste and I'm really scrambling to fix this. The gash was about 1mm deep but against the grain. No sanding this baby out. It is scramble and fill and it is gonna show no matter what I do. All you can do is disguise. Sucks. I could feel it wasn't gonna be a good day in the shop. Should have just stopped after the binding and gone crab fishing. Probably would have got skunked.
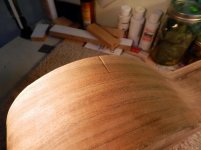
DSCN7356.jpg
 
No blood spilled so it doesn't really matter. In full recovery mode now. Everything is going to be fine, fine. Maybe. This is when you want to be working with dark wood like mahogany and not myrtle.

DSCN7358.jpg
 
why don't you beat the living crap out of it some more and tell people you have used relicing techniques ... people pay more for that don't they? :)

(don't listen to me!!!)
 
This is when it is time to reflect on your methods and see if there is a better/safer method. I can't say I've ever trimmed back on the bandsaw. Not saying it can't be done safely but it always seemed like it could go horribly wrong. Anyway, I'm always one for changing or trying out new methods, hopefully on test pieces rather than real instruments!
 
You know what? My heart always goes out to things like this. I was born with one eye smaller than the other one. I'm actually blind in that eye. Many people look at me as if I'm not a whole person. I am. I also have been beaten up by life at times.

Let that uke sing! Must we judge everything by its appearance? Hopefully it will have its share of scratches and dings from being loved and played. It deserves the chance to sing!

If I had the money, I'd buy it!
 
This is when it is time to reflect on your methods and see if there is a better/safer method. I can't say I've ever trimmed back on the bandsaw. Not saying it can't be done safely but it always seemed like it could go horribly wrong. Anyway, I'm always one for changing or trying out new methods, hopefully on test pieces rather than real instruments!
I've trimmed on the bandsaw but I used a "dead mans finger" method....now I do it on the bobbin sander with a fairly course grit.
 
Or you could make a thin line uke. I use a laminate trim router with a flush cut bit.
For me, part of becoming proficient at this craft is learning to deal with our "cockups" as Ken would say.
Yours on this uke woulda been too much for me as it'll show so it woulda been a thin line for me.
 
This is an opportunity to do a creative inlay.

I agree with Duane. I'd at least add a stripe of inlay (use whatever the binding is or paua) there and do the same on the other side of the bout, and maybe do that on the upper bout too. It's a feature, not a defect.
 
I agree with Duane. I'd at least add a stripe of inlay (use whatever the binding is or paua) there and do the same on the other side of the bout, and maybe do that on the upper bout too. It's a feature, not a defect.

Now I never thought of that: Lightening bolt inlays on all the bouts. Channels the vibrations!

As far as trimming on the bandsaw: Yes, I always saw this as a potential disaster in the making, but with good concentration I could get away with it. How many times do we do things that we know are maybe not the best way to do things but we do them anyway. The law of averages caught up with me. The problem was I got complacent as in lost my concentration. Also lazy because I trim by hand with a thumb plane instead of a flush cut router and I don't want to plane off any more than I have too so I cut just a little too close. Lesson learned. Don't do this.... Picture below of the patch. Of course the fill is way darker than the surrounding wood. I cut about as deep as I want to on the binding channel. It basically sucks and looks horrible, but what are you gonna do? Lesson: Do not trim waste on the bandsaw. It only takes a tenth of second and you got this.

DSCN7361.jpg
 
Add matching cuts all the way around and no one will ever know.
 
No. You can make a much better job of disguising that. The first problem is that it's going across the grain, which makes things much more difficult. If you are prepared to put in the time and to see it as a restoration job (as in a valuable old instrument) you should be able to get it virtually invisible except to those who only look very closely.
Success depends on whether you have any off cuts of the same wood. If you have then things become much easier. You need to graft in a few slithers of wood, running along the grain, matching up the grain as closely as possible.
This is the kind of idea, although with yours I'd probably do 3 long thin slithers running side by side. I wouldn't even begin to attempt it without doing a number of test pieces and even a few on scrap bent sides (or make some). It can be of great satisfaction, disguising things to a high level, it's a whole new skill set. More difficult than making. There are other techniques you can also use, like deliberately putting in a darker filler as a line running through it - so that it looks like a natural darker grain line running through, camouflage really.

Don't know if you have to register to see this but it's one I posted a few years ago. It's harder on a light coloured wood like Spruce. Yours has the problem of being much larger and on a curve, the wood is much darker though.


http://luthiersforum.com/forum/view...3079&p=435507&hilit=soundboard+repair#p435507
 
Last edited:
That was brill Michael...I have done similar things on flaws in rosettes using a microscope.. but that was better done than I could.

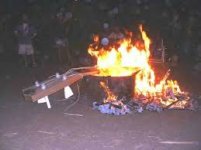
But I still like a good fire ;)
 
Last edited:
Wow, that is really nicely done, Michael. Thanks for showing that. I feel sure I will have ample opportunity to practice that technique in the future.

Nelson
 
There are a couple of things that need to be emphasised. If you have the off cut don't flip the wood. Learn to read grain direction and to match the reflection. If you haven't got the off cut you need a good stash of same type wood, then you need to go through all of it selecting the best match. Lining up the grain in the patch to the grain in the existing wood, that helps enormously. You have to fool the eye. Some even ink lines going through the patch. Then you can add colour to touch up varnish to disguise things further. It takes a lot of practice to get good at it, easy to overdo things.
One day I'll show you stuff that really will have your jaws dropping to the floor. . . . . not mine, these guys are in a completely different league. Then again if they were to 'fix' sequoia's blemish it might cost him a thousand dollars.
 
Top Bottom