Setting Up Shop

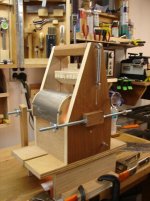
Those blues creek benders are fantastic! It looks like it only uses a heat blanket though, no heat lamps underneath?

It looks like I will be redoing the basement & will be adding an 8x10 workroom. I figure I can do all the bending & assembly work there while making all the sawdust outside!

Plus it gets really cold in the winters so it'll be nice to not have to brave it in order to get some work done...

S.

Seal that room and think about climate control when you do.
 
There is no way in the world I'd be willing to pay someone to build a side bender for me. They are dead easy to make, and you'll save yourself more than enough by building your own to pay for the blanket and slats.

Mine is 6" wide as is my guitar bender. That was to match the 6" wide blanket that I have. In the uke bender I bend both sides at the same time. Works brilliant.

And at around $500 they don't come cheap! Its a nice design though.

Do you have any pictures of yours? I'm trying to figure out what sort of clamping arrangement to use & how to make it adjustable for different sized forms.

As to climate control I'll look into it. I suppose the idea would be to turn it into a big humidor?

S.
 
........I'd highly recommend that you look at Mike Doolin's bender design. I think he's got it up on his site.......

I looked on his site and could not find it. Would anyone have a link to where I could see it? I searched and noticed that at least an early version was highlighted in a past issue of American Lutherie, but I only have issues starting from 2010. Thanks in advance!
 

Attachments

  • DSC03092.jpg
    DSC03092.jpg
    89.7 KB · Views: 31
  • DSC03257.jpg
    DSC03257.jpg
    94.6 KB · Views: 30
That looks great Ken...just one thing..the springs are there to fit on a hot copper support bar that goes under the lower sheet...the idea is the springs lift up the lower sheet to pinch and support the waist from below as the top screw is wound down...But it's not really needed
see here for the the ones at the Kamaka factory http://www.flickr.com/photos/pedalfreak/5571993470/sizes/l/in/photostream/

Chuck there's no Cabbages this year only Beans and Oninons I'll be planting the Cabbages ( Early Durhams) in a few weeks time for next year
 
Last edited:
What I was looking for in this design is a way of bending that was dead easy for one person to do who wasn't experienced at all, as I allow students to bend their sides. There aren't any ground breaking design features here. Just ideas that have been nutted out by others that I've incorporated into my hybrid of my ideal side bender.

Here's some shots of my guitar side bender. The uke one is exactly the same except that has a shorter base to accommodate the shorter body sizes in these instruments. Width is exactly the same at 6" inside, and hight is pretty much the same. I just built it to suit the moulds I use. On my uke bender I don't use the metal slat at the waist as these images. Got lazy and didn't add it, and can't see that it makes any difference so haven't got around to adding it.

You need to decide on a way of fixing the mould into the bender. On the guitar one I use a nut insert and furniture screw. On the uke bender I use dowels on the underside of the mould going into holes drilled through the base of the bender.

I register my sides from the butt join as per the Doolin design. Made much more sense to me rather than the using the waist. I use a lot of highly figured wood and sometimes want the pattern to be as close to perfect match at the butt seam.

You can see in the one image of the bending slats that there is a stop block. The sides are slipped into the slats with the blanket up against that stop block. When I do the bend the lower bout is bent around and those wooden pins are slipped in the location holes through the bending slat frame and into the body mould. The waist is driven down 1/2 way with the veneer press screw, the upper bout is bent around and then the last 1/2 of the waist is driven home. This really cinches up the metal slats pulling everything up tight.
 

Attachments

  • FIL22972.jpg
    FIL22972.jpg
    55.3 KB · Views: 36
  • FIL6751.jpg
    FIL6751.jpg
    42.7 KB · Views: 33
  • FIL22973.jpg
    FIL22973.jpg
    59.7 KB · Views: 33
  • FIL22975.jpg
    FIL22975.jpg
    55.5 KB · Views: 33
Last edited by a moderator:
But...the swirl goes down the toilet the wrong way where he lives!

Just kidding.

Actually, there are no toilets in Northern Queensland because the crocodiles were too attracted to them. And then the kangaroos attacked. And the cassowaries all want to pierce your heart with their dominant claw. And the banana trees don't produce good ukulele making wood...

But the Aussies do have some incredible timbers for backs, sides, and necks. Top wood is an issue...

I've got a stack of office paper put aside for tops.


................................And it's the drop bears you've really got to be scared of, you don't even see them coming.
 
Thanks for those pics, it makes it quite a bit clearer on how to proceed.

Basically the base needs to be wide enough to fit a mold of approx. 6" & high enough to let the ends bend down freely.

Why are there springs attached to the waist press? Wouldn't the screw hold it in place?

S.
 
Many Fox Style benders used a couple of springs and the bar in the middle to pull the slats up against your wood and heat blanket sandwich and then the waist caul in order to help keep the heat in the waist, as it's usually the tightest bend, as well it would help support that area when you were bending. Look at picture 2 and imagine the slats and wood etc between that alloy bar and the wooden waist caul.

I use it on guitar side bender because all the examples I saw on the internet had them so I built it that way and it's there. I built the uke bender latter but just haven't found a reason to add it to the uke one.

My bender is 6" wide because that is how wide my blanket it. It just happens that I can bend both sides at the same time on ukes. Just one at a time for guitars though as 2 of them end up being too wide. You can build your bender to whatever size suites you. Just best to have some of the components on hand before diving in.

I had a friend in the US spot a sale on veneer press screws at Rockler a few years ago and sent some over for me and some other Aussie Luthiers. You could also use a tail vise screw etc.
 
Last edited by a moderator:
I use it on guitar side bender because all the examples I saw on the internet had them so I built it that way and it's there. I built the uke bender latter but just haven't found a reason to add it to the uke one.

So your uke bender just has the screw down attached directly to the caul?

Thanks for taking the time to explain all this Allen. You've been a big help.

I was planning on doing a stewymac next but I think I'm going to save my duckets for the proper building supplies required & go from scratch. It'll take longer to complete the project but I'll learn more & in the end I'll have a nice set of tools to make the next one!

Can anybody recommend a good supply shop in Canada, or should I be going to StewMac or LMII?

S.
 
Top Bottom